
Action Type: S3
Security Requirements and Controls
Create Actionspermission
Available: Action type:S3 v1.221.0
Action type:S3 is available from version 1.221.0.
The S3 action uploads query results from LogScale to Amazon S3 buckets as files. When configured, this action can be triggered by alerts or scheduled searches to export event data in either CSV or NDJSON format.
To use the S3 action, you need the following prerequisites:
An S3 bucket to store the files in.
Appropriate IAM identity configured. Self-Hosted customers must configure the IAM identity through the
S3_ACTION_ACCESSKEYandS3_ACTION_SECRETKEYvariables.Appropriate IAM role configured in your AWS account. Clusters using S3 Archiving can reuse the same IAM role, as the S3 action uses a similar configuration. For details on how to create the IAM role for the S3 action, see Configure an S3 Action.
Configure an S3 Action
Security Requirements and Controls
Create Actionspermission
Available: Action type:S3 v1.221.0
Action type:S3 is available from version 1.221.0.
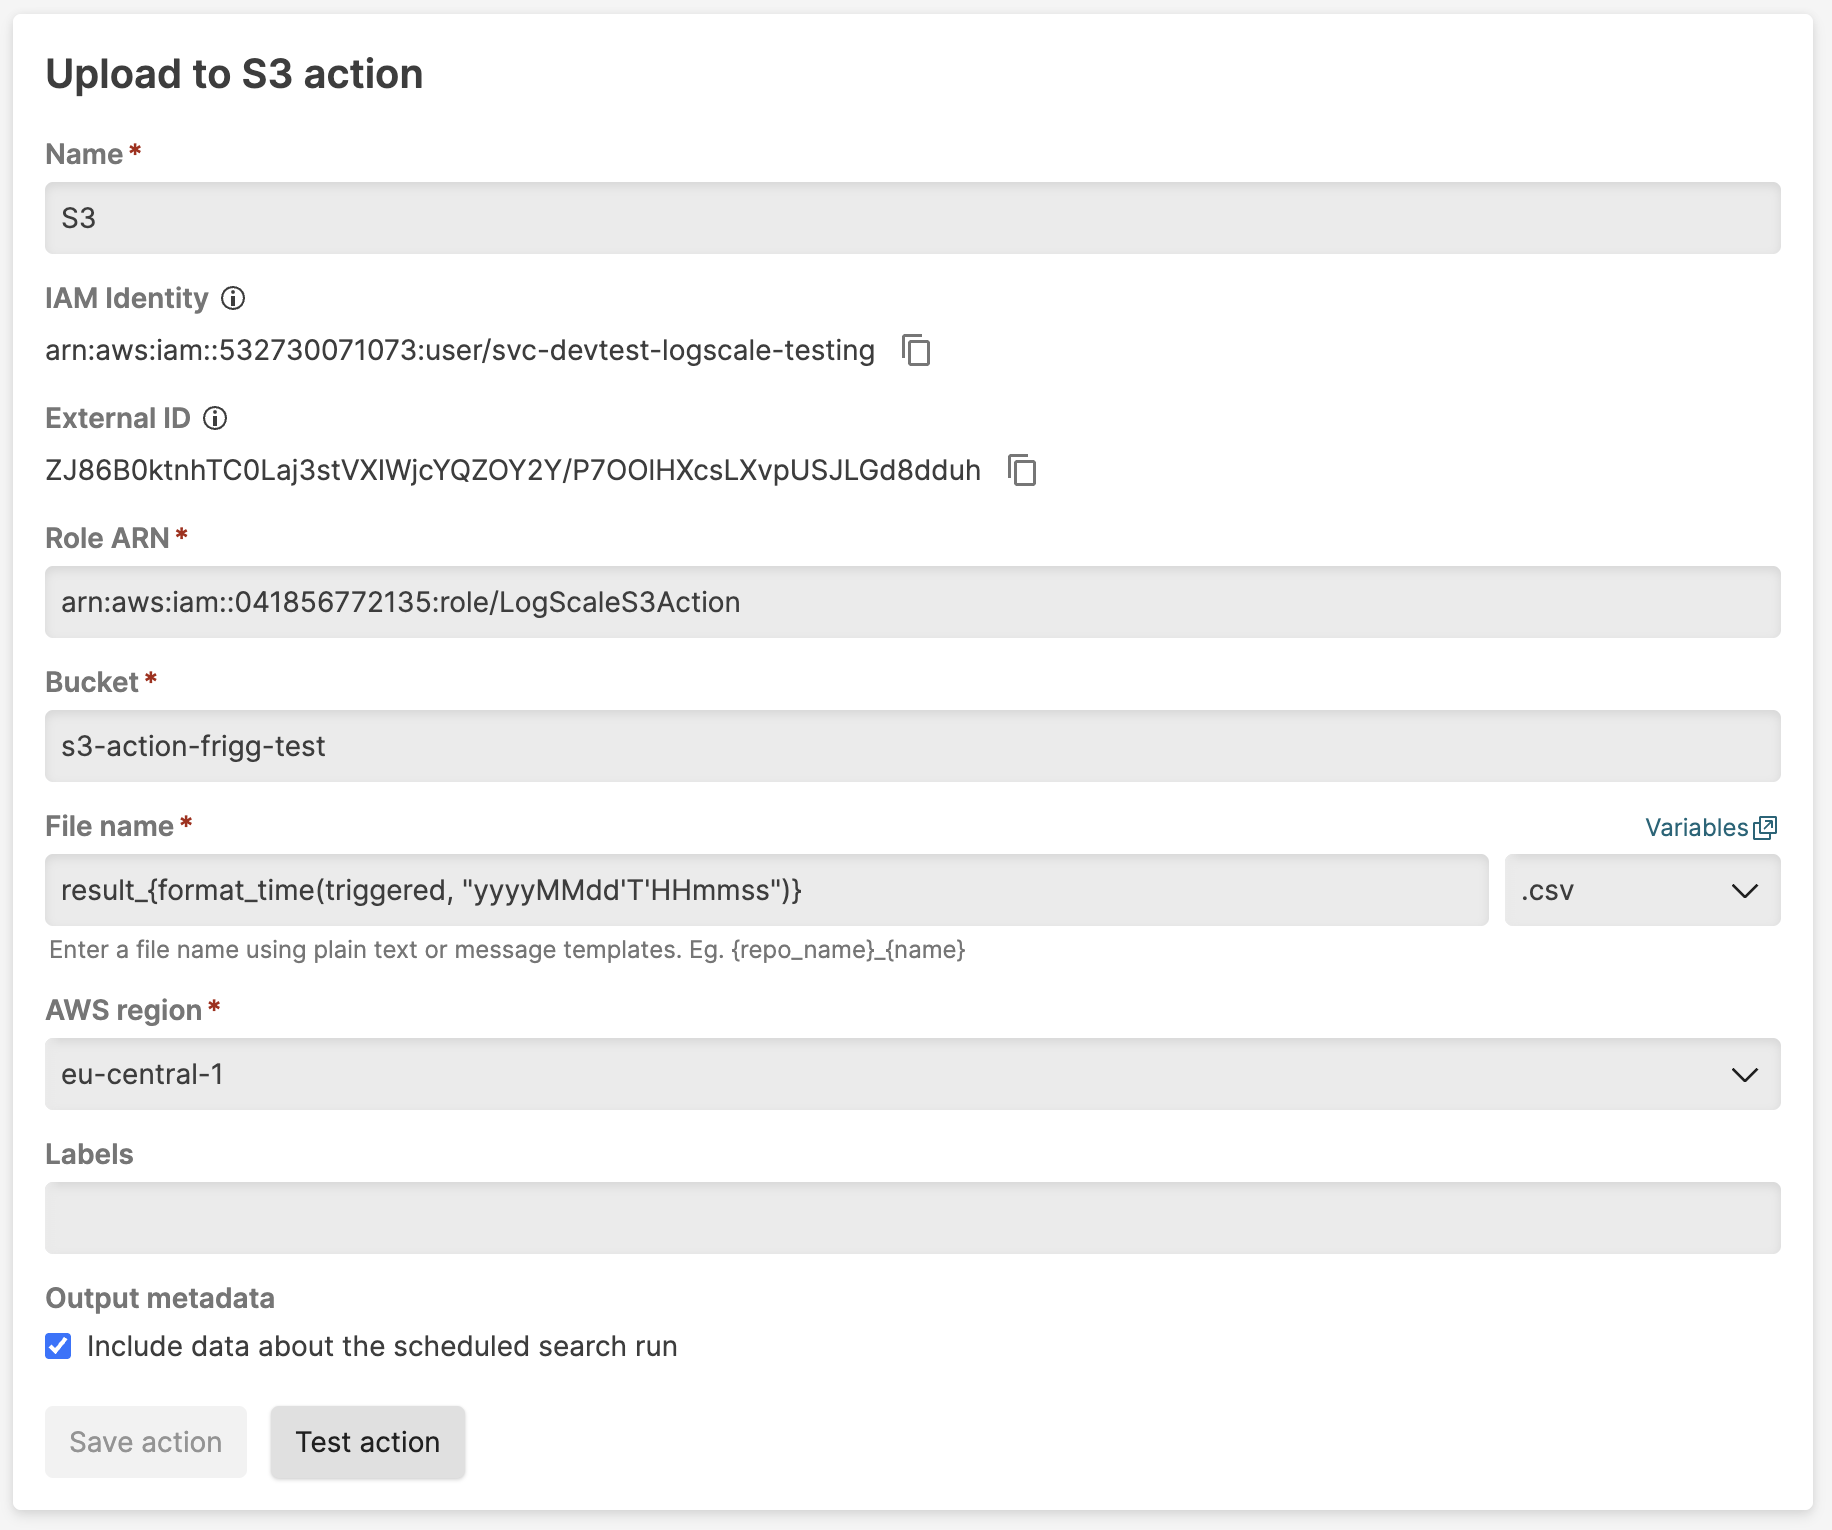 |
Figure 287. S3 Action configuration
To set up an S3 action:
In the menu navigate to the
Actionsinterface and click . For more information on how to create actions, see Create Actions.In the dropdown, select .
Configure the following settings:
Table: S3 action parameters
Parameter Description Name The name provided for the action. Role ARN Amazon Resource Name that allows writing to Amazon S3 bucket.
The LogScale IAM identity is displayed in the configuration form (see Figure 287, “S3 Action configuration”). You must grant this identity permission to assume a role with write access to the S3 bucket; to do so, you need to create an IAM role in your AWS account.
To create an IAM role in AWS:
Log in to the AWS console and navigate to your S3 service page.
If you are not using an existing bucket, create a new bucket. Follow the instructions on the AWS docs on naming conventions. In particular, use dashes not periods as a separator, and ensure you do not repeat dashes and dots.
If you are using an existing bucket, make note of the name to input in Step 11: Enter bucket name.
Navigate to IAM and click Roles.
Create a new role and select Custom trust policy. Copy and paste the trust policy below. You will customize it in the next steps.
JSON{ "Version": "2012-10-17", "Statement": [ { "Sid": "AllowLogScaleS3Action", "Effect": "Allow", "Principal": { "AWS": "arn:aws:iam::123456789012:user/LogScaleS3Action" }, "Action": "sts:AssumeRole", "Condition": { "StringEquals": { "sts:ExternalId": "2ph55aGUve1rxxLv9B4CFnnb/ItCOD9MHBBsna9KBiFFPahzq" } } } ] }Go to LogScale and in the S3 action form, copy IAM Identity. Switch to AWS and paste it into the AWS field in your trust policy.
Return to LogScale and in the S3 action form, copy the External ID. Switch to AWS and paste it into the sts:ExternalId field in your trust policy. Then click in AWS.
Click to skip creating a policy for now.
Enter a name for the role. Click .
Search for the role you created and open it. Click the button and choose .
Switch the policy editor in AWS to use JSON and copy and paste the below into the policy editor. You will customize it in the next steps.
JSON{ "Version": "2012-10-17", "Statement": [ { "Sid": "AllowWriteToBucket", "Effect": "Allow", "Resource": "arn:aws:s3:::MyLogScaleS3ActionBucket/*", "Action": "s3:PutObject" } ] }In the pasted text, change the bucket name
MyLogScaleS3ActionBucket/*to match the name of the bucket you created in Step 2: Create bucket or the existing bucket you noted. Be sure that the/*is preserved.Enter a name for the policy and click .
Locate the ARN on the role in AWS and copy it.
Go back to LogScale and in the S3 action form, paste the ARN you copied into this Role ARN field.
Bucket The Amazon S3 bucket to store the file. File name The name provided for the file. Option to use {_}message templates as per LogScale's Message Templates and Variables. Files can be in CSV or NDJSON format.AWS region Select the Amazon region. This should correspond to the region that your S3 bucket is created in. Labels Adding labels enables you to group actions by the label in the Actionspage. See Figure 276, “Actions Page”.Output metadata Check the box to output a separate JSON file containing all relevant metadata for the uploaded events. Optional: click to verify that the action is working properly before creating it.
Click (or if you're editing an existing configuration). The S3 action is now fully configured and ready to use.
Size Limitations
Security Requirements and Controls
Create Actionspermission
Available: Action type:S3 v1.221.0
Action type:S3 is available from version 1.221.0.
The upload file size is limited by the
S3_ACTION_MAX_FILE_SIZE_BYTES environment variable, which
has a default size limit of 50 MB.
When events exceed the configured limit, LogScale truncates the
file and appends .truncated to the filename. For
example:
myfile.ndjson→myfile.truncated.ndjsonmyfile.csv→myfile.truncated.csv