


Charting Metric Data
In this scenario, you have a service that periodically writes metrics to its logs. This could be tools such as Dropwizard or Micrometer or a system monitoring tool like MetricBeat. Possible use cases include:
Track disk utilization across multiple volumes
Monitor CPU and memory usage trends
Compare metric values across time periods
Visualization: The chart displays a stacked area chart with three time series, one for each disk metric (Disk 0, Disk 1, and Disk 2). Each series shows the maximum metric value recorded in each time bucket. Data points are visible on each series for detailed monitoring. Hover over data points to see exact values and timestamps. Series are color-coded and labeled in the legend for easy identification.
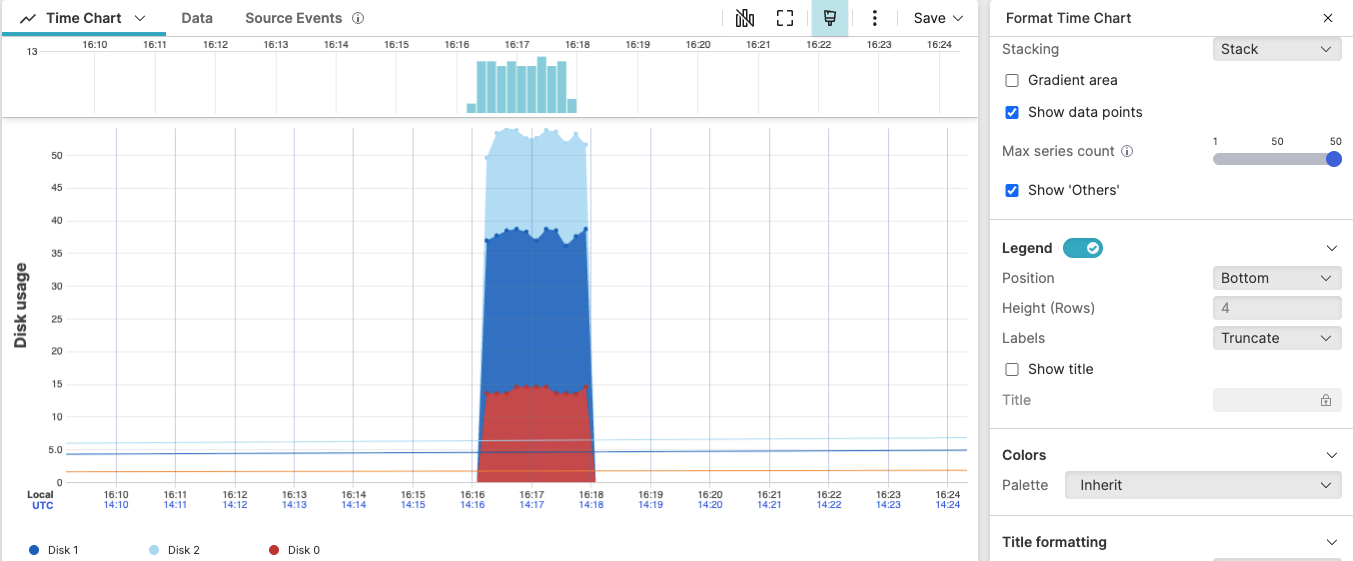 |
Figure 258. Charting Metric Data
Sample input data. Here is example input data for this scenario:
| @timestamp | cpu_usage | disk0 | disk1 | disk2 | id | memory_usage | type |
|---|---|---|---|---|---|---|---|
| 1970-01-01T00:00:02 | 45.2 | 11.21 | 21.14 | 12.01 | m001 | 67.8 | metrics |
| 1970-01-01T00:00:02 | 52.3 | 10.57 | 20.41 | 11.91 | m002 | 72.3 | metrics |
| 1970-01-01T00:00:02 | 38.9 | 9.15 | 19.12 | 10.07 | m003 | 65.4 | metrics |
| 1970-01-01T00:00:02 | 61.4 | 12.34 | 22.45 | 13.21 | m004 | 78.9 | metrics |
| 1970-01-01T00:00:02 | 70.5 | 13.45 | 23.67 | 14.32 | m005 | 82.1 | metrics |
where disk0, disk1, and disk2 represent disk utilization metrics, and cpu_usage and memory_usage represent additional system metrics that you can visualize in a time chart.
Query. To create this time chart, use the following query:
type = metrics
| timeChart(function=[max(disk0, as="Disk 0"), max(disk1, as="Disk 1"), max(disk2, as="Disk 2")])
Query breakdown:
Filter for events with type=
metrics.Use the
timeChart()function with thefunctionparameter containing an array of aggregate functions.Apply the
max()function to each metric field (disk0, disk1, disk2) to extract the maximum value within each time bucket. When events fall within the same time bucket,max()selects the largest value to represent that bucket.Use the
asparameter to assign descriptive series names (Disk 0, Disk 1, Disk 2) for chart legend clarity.
Configuration:
From the
Searchpage, type your query in the Query Editor → clickChoose in the
Widget SelectorClick the style icon : the side panel shows most settings already configured by default based on the query result.
In Plot, configure the chart appearance:
Set Type to
AreaSet Interpolation to
LinearSet Stacking to
Stackto display metrics as a stacked area chartEnable Show data points for better visibility of individual metric values
Keep Show 'Others' enabled to display additional series beyond the max series count
In Legend, configure legend display:
Set Position to
BottomAdjust Height (Rows) to control legend size (for example, 4 rows)
Set Labels to
Truncateto prevent long series names from wrapping
In Colors, set Palette to
Inheritto use default color scheme.In Trend line, enable the toggle and set Regression type to
Linearto show data trends over time.In Bucket behavior, set Latest bucket (live) to
Includeto show the most recent data bucket.In X-axis, enable Show UTC time to display timestamps in UTC timezone.
In Y-axis, configure the vertical axis:
Set Title to
Disk usageSet Scale to
LinearSet Format value to
Metricfor automatic unit formatting
In Series formatting, customize each series:
Click on a series name (for example, Disk 0) to expand its settings
Adjust Color for each disk metric to ensure visual distinction (in this example, red for Disk 0, blue for Disk 1, light blue for Disk 2)
Optionally modify Label to customize series names in the legend
In Title formatting, set Size to
Medium.
You can further customize this widget by setting more properties, see Time Chart Property Reference.