
Entra ID (formerly Azure Active Directory)
LogScale can integrate Entra ID (formerly known as Azure Active Directory or Azure AD) for identity and access management. Find detailed steps for creating an Entra ID application, configuring SAML-based single sign-on, and setting up group synchronization between the two platforms. For cloud customers, the integration process requires working with Support to complete the configuration while following specific requirements for security controls and permissions.
Entra ID is Microsoft's enterprise cloud-based identity and access management (IAM) solution. It can be used to access your LogScale repositories. Microsoft365 also uses this interface, for more information see Tag Fields Created by Parser microsoft365.
Prerequisites to configure Entra ID
Prior to configuring Entra ID for authentication with LogScale make sure to have the following:
Integrate Entra ID with LogScale
To integrate Entra ID with LogScale, three main operations are required:
Create Entra ID application
Set up LogScale IDP configuration
Set up group mapping (optional).
Step 1 — Create an application
Sign in to the Azure portal and choose the Entra ID ID card:
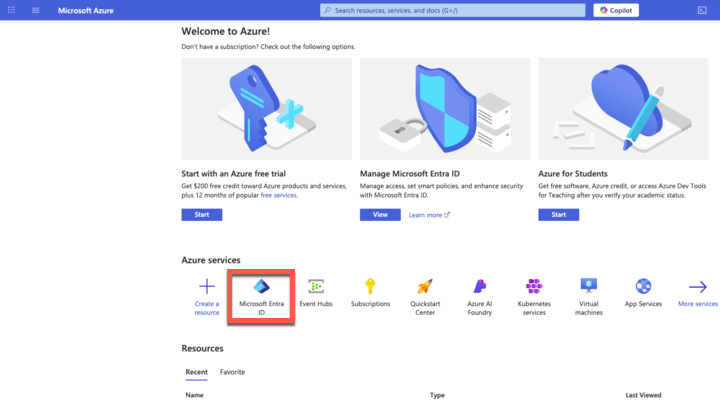
Figure 32. Azure Active Directory
Open Groups and click : here you create the groups that will be added later in LogScale for synchronization. For example, you can create a logscale_admin group.
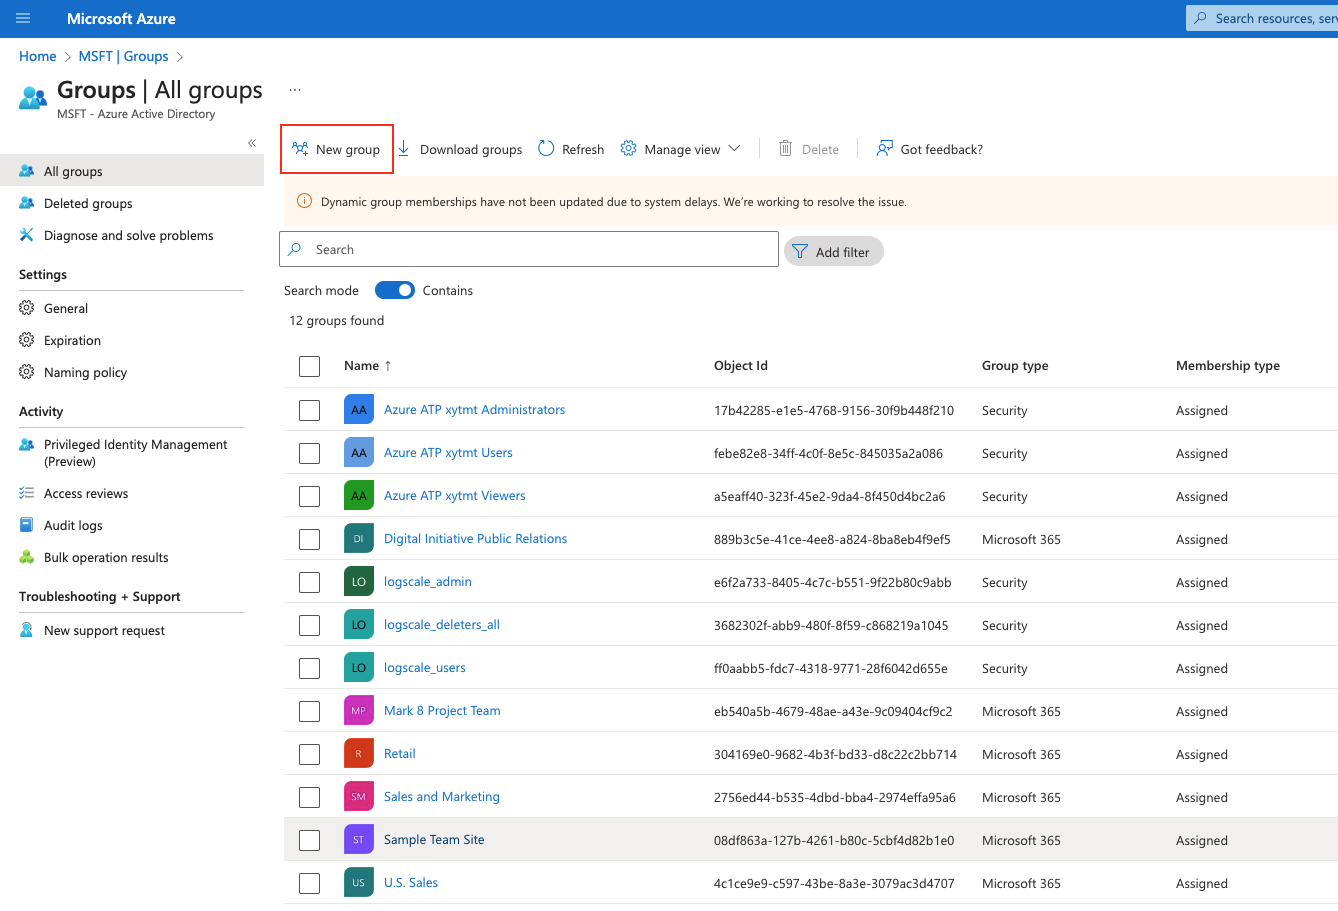
Figure 33. Groups in Azure AD
Open Enterprise Applications and click :
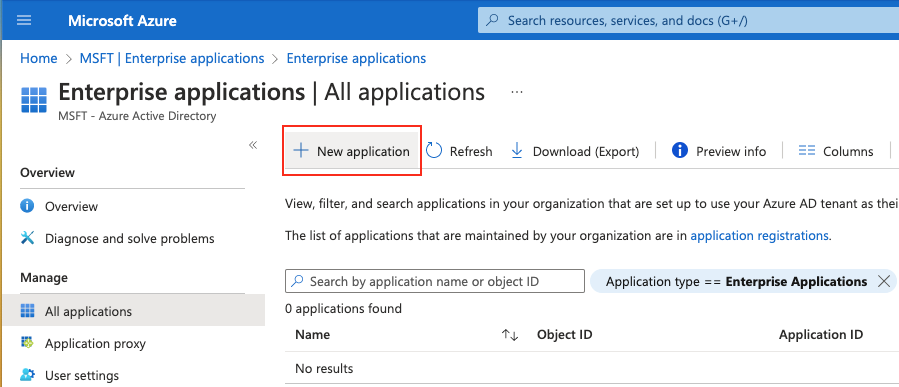
Figure 34. Enterprise Applications in Azure AD
From the Browse Entra ID App Gallery page:
Click
Enter a name for the app, e.g., logscale_idp
Choose Integrate any other application you don't find in the gallery option
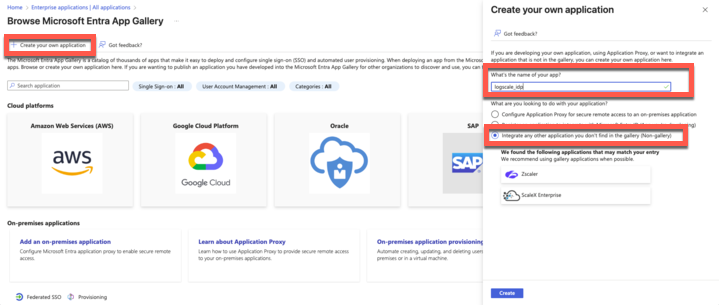
Figure 35. Create your application in Azure
Click : your application is now added successfully.
Step 2 — Set up LogScale IDP configuration
In the new application page, click Single sign on and then choose SAML as your single sign-on method:

Figure 36. Select SAML single sign-on
In the Basic SAML Configuration window:
Click . Set Identifier (Entity ID) to
$YOUR_LOGSCALE_URL/api/v1/saml/metadataClick . Set Reply URL to
$YOUR_LOGSCALE_URL/api/v1/saml/acsIf needed, set Sign on URL if you want to perform identity provider-initiated single sign-on. Contact LogScale Support to get the Sign on URL.
If needed, populateRelay State with an integration URL to instruct the application where to redirect users after authentication, for example, the URL to a specific location within the application.
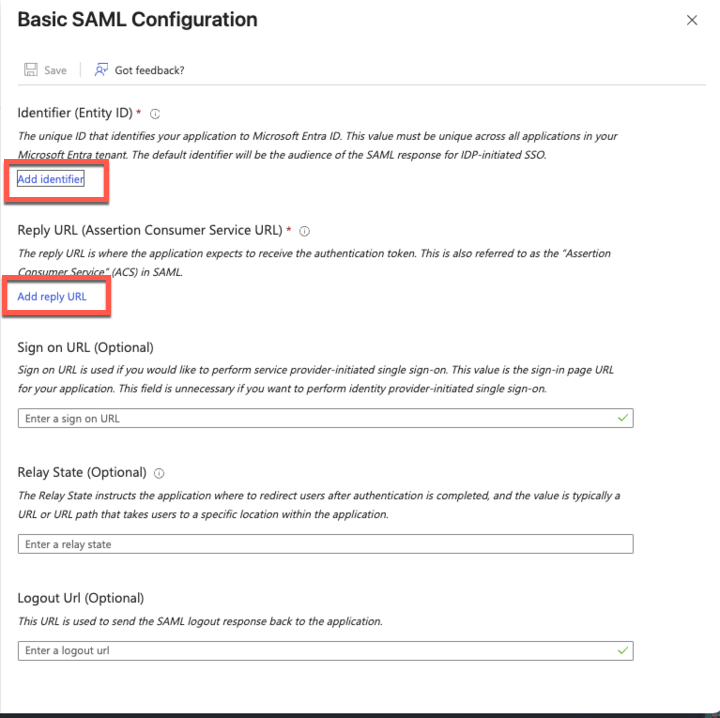
Figure 37. Basic SAML Configuration settings
In the SAML-based Sign-on page of your newly created application, copy the Login URL, Azure ID Identifier, and the text of the Certificate (Base 64) as you will need them later for LogScale.
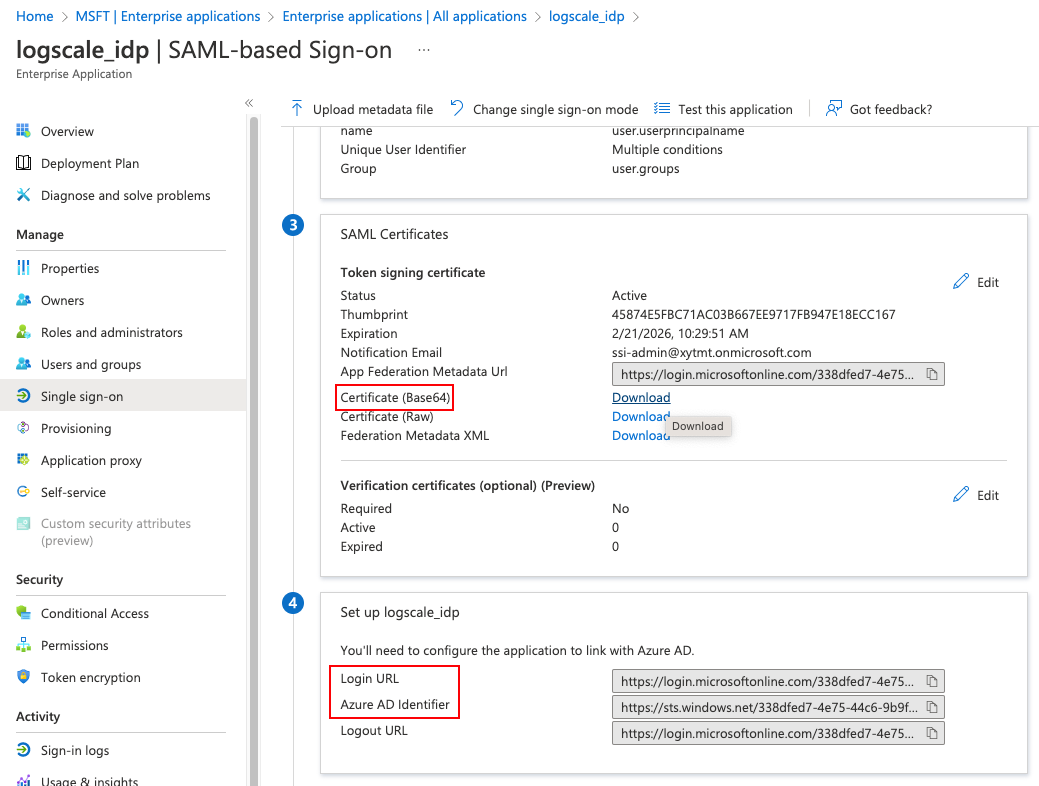
Figure 38. SAML-based Sign-on information
Step 3 — Set up group mapping (optional)
Go to
Attributes and
            Claims
. Click and select which groups you want to be associated with the users (except None) and the source attribute. Click .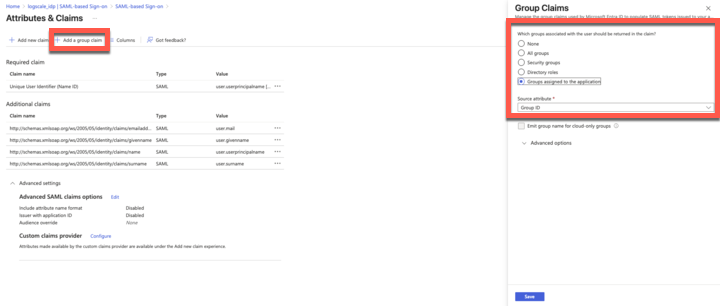
Figure 39. Add a group claim
Still in the
Attributes and
            Claims
page, click the first claim Unique User Identifier to assign users to LogScale on the IDP side.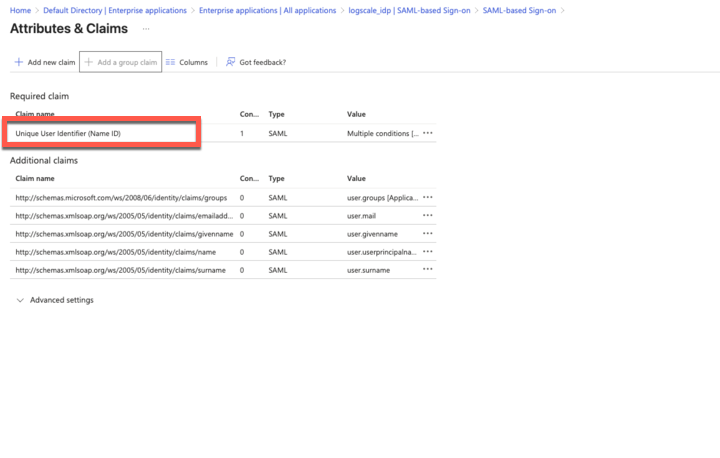
Figure 40. Edit the Unique User Identifier claim
In the
Manage
            claim
window, ensure that Name identifier format and Source are set as in figure below: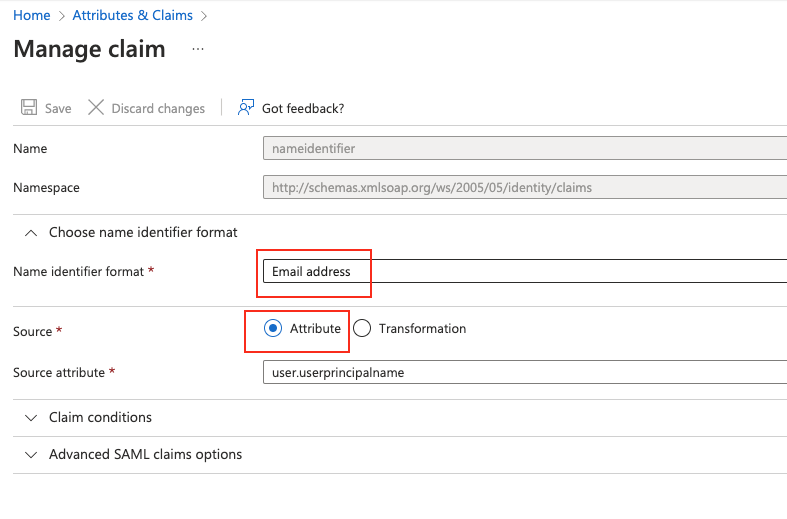
Figure 41. Manage claim
Still in the
Manage
            claim
window, expand Claim conditions and click Scoped Groups to select the new group and assign user type (e.g. Members, Admin) and as the value: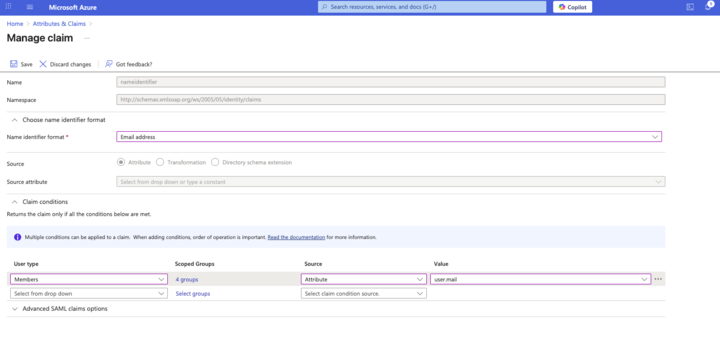
Figure 42. Add user types to group
Configure LogScale to use Entra ID
When Entra ID is configured to work with LogScale, you must configure LogScale to work with Entra ID.
Important
For Cloud customers, gather the information on Requirements for identity provider configuration and Configure SAML for LogScale Cloud, then contact Support to set up your chosen IdP service.
Group synchronization
After LogScale has been configured to use Entra ID, you need to align the Entra ID groups' Object ID in LogScale.
Go back to Azure AD and from your group's page, copy the Object ID:
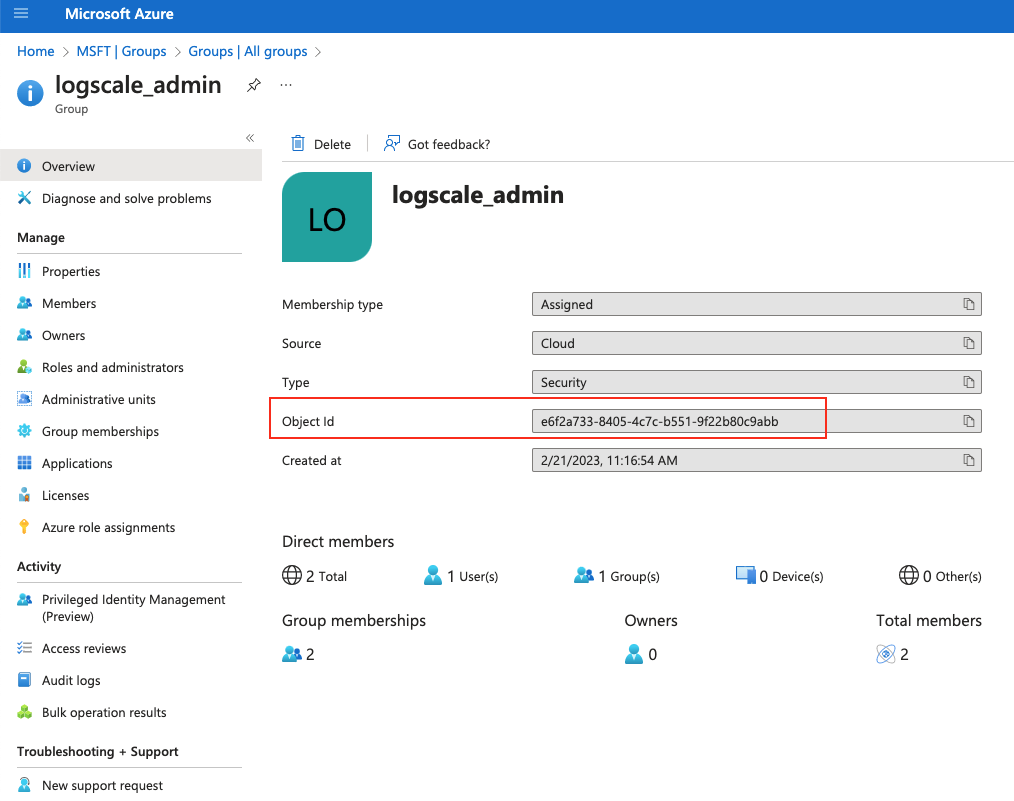
Figure 43. Copy Object ID from Azure AD
In LogScale, first create the group manually (provide a name that is similar to the group name set in Azure AD) and then paste the Object ID into the Mapping Name field, under the External provider tab:
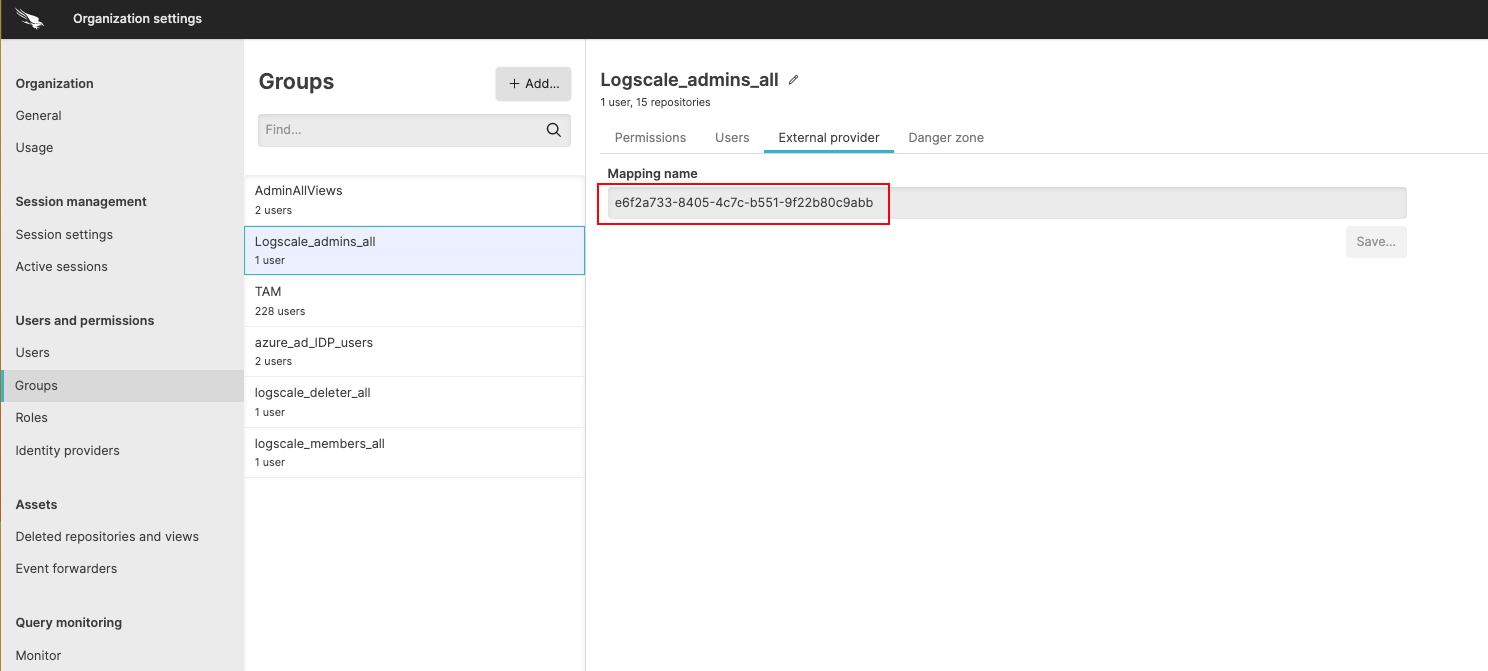
Figure 44. Mapping Name
Test the Entra ID integration setup
Once all of the necessary steps to set up the Entra ID authentication for LogScale are completed, you need to test the setup.
Go to a Terminal and start LogScale with the following command:
shell./run.shAllow two to three minutes for LogScale to start.
Connect to localhost in a browser. It should redirect you to a Microsoft login.
Sign into your Entra ID. You should be taken to LogScale.
Other references for Entra ID configuration
Other documentation about Entra ID configuration that may be helpful includes:
Entra ID ID for more information on SAML 2.0 integration
Microsoft Entra ID documentation for more information on Entra ID ID.