

Amazon Managed Streaming for Apache Kafka (MSK)
As an alternative to using Apache Kafka, if you want to install LogScale on an Amazon AWS Instance, you can use Amazon Managed Streaming for Apache Kafka. This is known as Amazon MSK.
See the official AWS MSK documentation for more information on this Amazon service.
Pre-Requisites
There are a couple of pre-requisites to using Amazon MSK with LogScale. First, ensure that you have the AWS CLI tools installed and configured on your machine. Also make sure you have the Access key and Secret key. This is so you can create custom configurations for your MSK instance.
Next, you'll need to have a Virtual Private Cloud (VPC) set up for your Availability Zones on AWS, with a subnet for each Kafka broker. If you don't, please follow the relevant steps in the AWS documentation on Getting Started Using Amazon MSK.
Custom MSK Configuration
Read the documentation on how to add a custom configuration file to MSK. If no configuration file is supplied, MSK will change these configuration parameters from normal Kafka defaults. Because LogScale requires certain configuration parameters to be implemented for Kafka, you need to make a custom configuration file for MSK to use.
First, create a file named kafka.properties and
add the following values to it:
replica.fetch.max.bytes=104857600
message.max.bytes=104857600
compression.type=producer
unclean.leader.election.enable=false
The full list of other MSK parameters that can be used can be found in AWS documentation.
Next, create the configuration file for use within MSK. The name and description can be anything, but the name can't contain spaces.
$ aws kafka create-configuration \
  --name "LogScale-MSK-Configuration"
  --description "Custom LogScale configuration for MSK"
  --kafka-versions "2.3.1"
  --server-properties file://config-file-path
You should see a success message similar to this:
{
  "Arn": "arn:aws:kafka:us-east-1:123456789012:configuration/LogScale-MSK-Configuration/abcdabcd-abcd-1234-abcd-abcd123e8e8e-1",
  "CreationTime": "2019-05-21T00:54:23.591Z",
  "Description": "Custom LogScale Configuration for MSK",
  "KafkaVersions": ["2.3.1"],
  "LatestRevision": {
    "CreationTime": "2019-05-21T00:54:23.591Z",
    "Description": "Custom LogScale Configuration for MSK",
    "Revision": 1
  },
  "Name": "LogScale-MSK-Configuration"
}
Creating MSK Cluster using AWS Console
 |
Figure 8. Creating MSK Cluster using AWS Console
Once you're logged into the console, go to AWS MSK Service and then click on Create Cluster.
Give the Cluster any name. Pick the VPC you have created for this MSK Cluster. See the Amazon MSK page for setting up the VPC.
You'll need to select your Kafka version. We recommend version 2.4.0 for LogScale.
Select also your Availability Zones and a subnet for each one. We recommend three Availability Zones.
Then add the custom configuration file, which you uploaded earlier under Creating your custom MSK Configuration File. Select Use a Custom Configuration and select the name of the configuration file you gave when you created it.
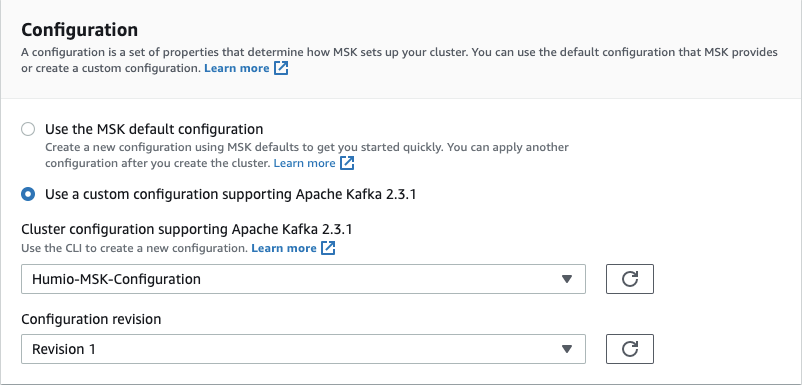 |
Figure 9. AWS MSK Configuration
Next, create your brokers. Kafka brokers use m5 instance types. Specifications for these can be found on the Instance Types under the m5 tab. Define how many brokers you're going to have per availability zones.
Optionally, you can add some tags for your cluster. You can find more information about tagging on the AWS Tagging Strategy documentation page.
Define how much Storage each broker will have. MSK uses AWS' Elastic Block Storage. The amount of storage you chose should correlate to how much data you're ingesting. See our Instance Sizing documentation page for advice on this. Note, you can't decrease the storage once created.
If you will use this AWS instance as part of a cluster, we recommend
encryption be enabled. Encryption between clients and brokers is
possible, but requires some additional steps. These can be found in
the Configuring
Encryption section below. If you select
plaintext brokers, this will be
on port 9092; brokers using TLS will be accessible on port 9094.
If you require using TLS Client authentication, you can read more about how to do this on the Mutual TLS Authentication documentation page.
You should choose your monitoring. Basic monitoring is available for free, but the enhanced monitoring costs extra. More information can be found on the Monitoring an Amazon MSK Cluster documentation page.
When selecting your security group, it's important to note that your LogScale instance must be able to connect to MSK. This can be either allowing inbound and outbound rules for the IP of your LogScale instance, or if LogScale is running on AWS, adding them to the same security group.
When you've finished all of these steps, click on the button to create your cluster.
Configuring LogScale
Once your MSK cluster has been created, you can then deploy LogScale, specifying the correct Kafka host information. To find out the Kafka host information, you can go into your MSK installation in the AWS Console and View Client Information. If you're using the PLAINTEXT Kafka host information, this will be on port 9092, and TLS brokers will be on port 9094.
When running LogScale on AWS EC2 instances you should ensure that the security group rules allow LogScale to access MSK and vice versa, and we recommend you do this by keeping the two in the same security group. More information on MSK documentation. Include your Kafka and ZooKeeper host information into your LogScale configuration
KAFKA_SERVERS=b-1.test-msk-cluster.luq8jf.c3.kafka.us-east-2.amazonaws.com:9092,b-2.test-msk-cluster.luq8jf.c3.kafka.us-east--2.amazonaws.com:9092,b-3.test-msk-cluster.luq8jf.c3.kafka.us-east-2.amazonaws.com:9092Configuring Encryption
It's possible to enable encrypted connections between LogScale and Kafka brokers. To do this you need to create a file on each LogScale node that contains this parameter
security.protocol=SSL
In your LogScale configuration file, add the parameter
EXTRA_KAFKA_CONFIGS_FILE which points to the name of
the file that you just created. Then ensure that your
KAFKA_SERVERS LogScale parameter now points to the
Kafka brokers that are using TLS which should be on port 9094.
Once you run LogScale, you can visit the administration dashboard to ensure you can see your MSK Kafka Brokers and ZooKeeper nodes.