
Managing Dashboard Parameters
Security Requirements and Controls
Change default search settingspermission
Dashboard parameters allow you to interact with dashboards for performing filtering and assisting with drill-down dashboards.
By providing parameters within your queries, you allow your users to configure values in the dashboard for the fields you have defined as being the parameters for that dashboard.
Here is an example of query with parameters on the Search page:
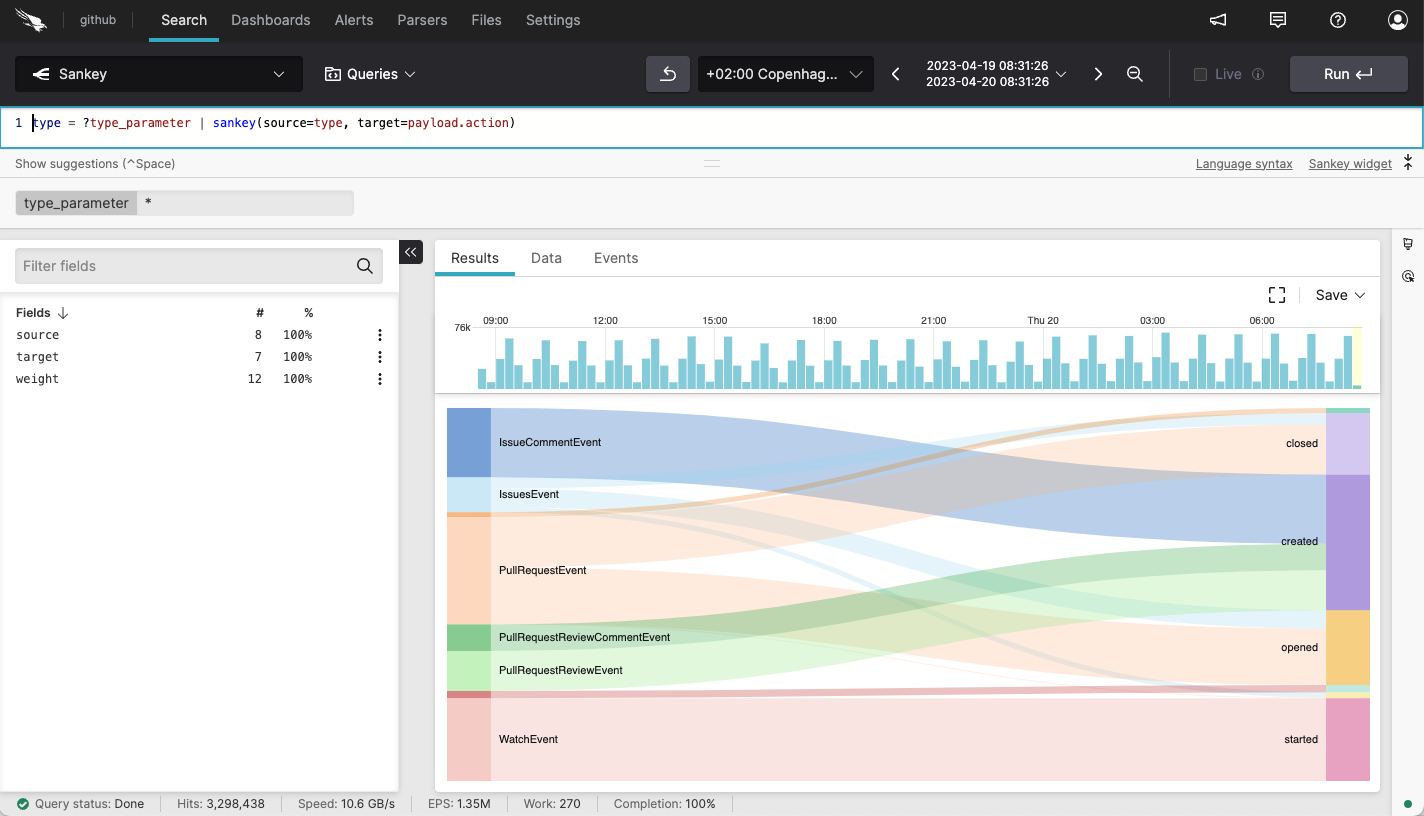 |
Figure 121. Query Parameter in Search
All parameters are added to the query using the
?parameterName syntax e.g., ?type_parameter in
the example above. For more details on the syntax used for query
parameters, see User Parameters/Variables.
When you specify some parameters in your query, they automatically appear as options during searches, and then the query is used as part of a widget within a dashboard. This allows for users to submit values for a query without the need to edit the query directly.
Here is an example of parameter on the
Dashboards page, where the
?type_parameter parameter is discovered and used by two
different widgets within the dashboard:
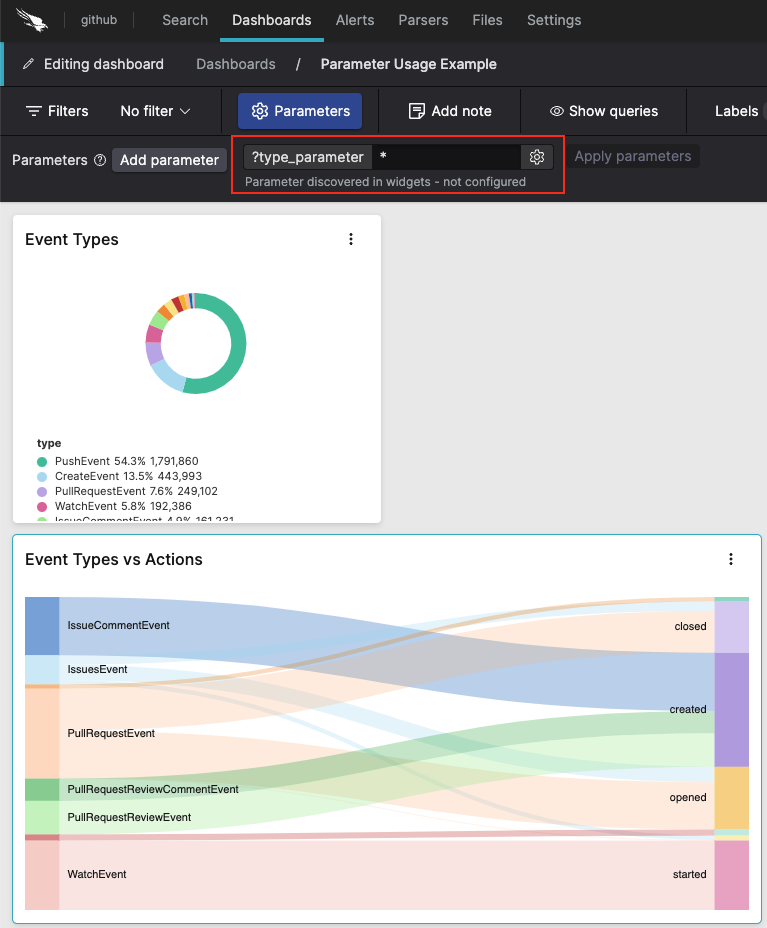 |
Figure 122. Query Parameter in Dashboard
Parameters with the same name used in different widgets use the same input field. This allows you to impact multiple widgets with a single parameter input field.
Therefore, dashboards show a list of unique parameter names across all widgets, meaning that, if multiple widgets use the same parameter — like in the example figure above — the parameter name will only appear once on top of the dashboard. This also means that, whenever you need to delete a parameter that multiple widgets have in common, you will have to remove it in each single widget.
If a new widget uses a different parameter name instead, then this new parameter name will be added on top of the dashboard, and will of course use a different input field.
See Adding Parameters and Configuring Dashboard Parameters for how to set parameters in the UI and the syntax usage.
There are different kinds of parameters you can set, find them all described at Parameter Types.
For examples of parameters used in dashboards, see Examples of Parameterized Dashboards.
Adding Parameters
You can add dashboard parameters in two ways.
Specify parameters in the search query:
Insert one or more parameters in the query using the syntax
?parametername, for example:logscaleComputerName = ?ComputerName AND AgentIdString = ?aid AND CustomerIdString = ?cidIn this query, the
?ComputerNameparameter works as a single-value parameter, meaning that it allows to submit a single string as its value.To support specifying one or more values, you can make it a multi-value parameter by using an array syntax instead:
logscalein(ComputerName, values=[?ComputerName])For more explanations on how multi-value parameters are used, see Multi-value Parameters.
Run the query, select the desired widget type and add the widget to the dashboard: parameters set in the query are automatically discovered on the dashboard and will appear at the top of it.
Add parameters directly from the dashboard interface:
Click the pencil icon on the top right to take the dashboard in Editing dashboard mode.
On the top left of the dashboard, click and .
For the added parameters to take an effect on the widgets, edit your widget queries to include the parameter syntax, as described in Specify parameters in the search query. Similarly, to remove parameters select from the ⋮ icon of each single widget and delete all
?parameternamesyntax references from the widget's query.
By default the input fields are plain text fields that default to * — as on the Search page. But you can customize parameters to make them easier to use, and to select values in a dropdown instead of manually typing. See Configuring Dashboard Parameters for information on how to configure and customize your parameters.
Configuring Dashboard Parameters
To configure your parameters in a dashboard:
Click the pencil icon on the top right to take the dashboard in Editing dashboard mode
Click the cog icon next to each ?param-name field:
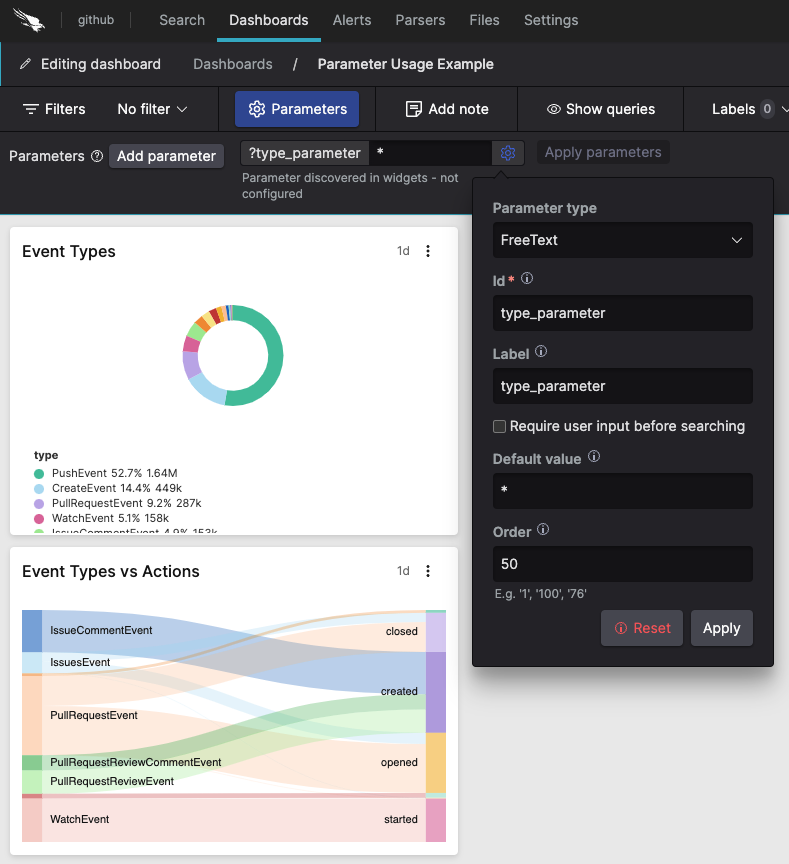
Figure 123. Configuring Parameters
Configure the available settings:
Parameter Type choose the type from a list of available Parameter Types.
Id — is the ID of the parameter e.g.,
userwill mean you use?userto reference it in a query. When changing the ID of a parameter you will have to manually update any queries using it to reflect the name ID.Label — is the name displayed in the list of parameters. For example,
Usernamein place of?userwould best suit to appear on the dashboard.Require user input before searching — allows preventing the dashboard from executing any queries on page load until the user provides a value to the parameter. (Version 1.85.0 and later)
For example, in the query:
logscalein(method, values=?method)widgets that use the
?methodparameter will defer their execution until their user has entered a value e.g.,GETorPOSTin the parameter's input field: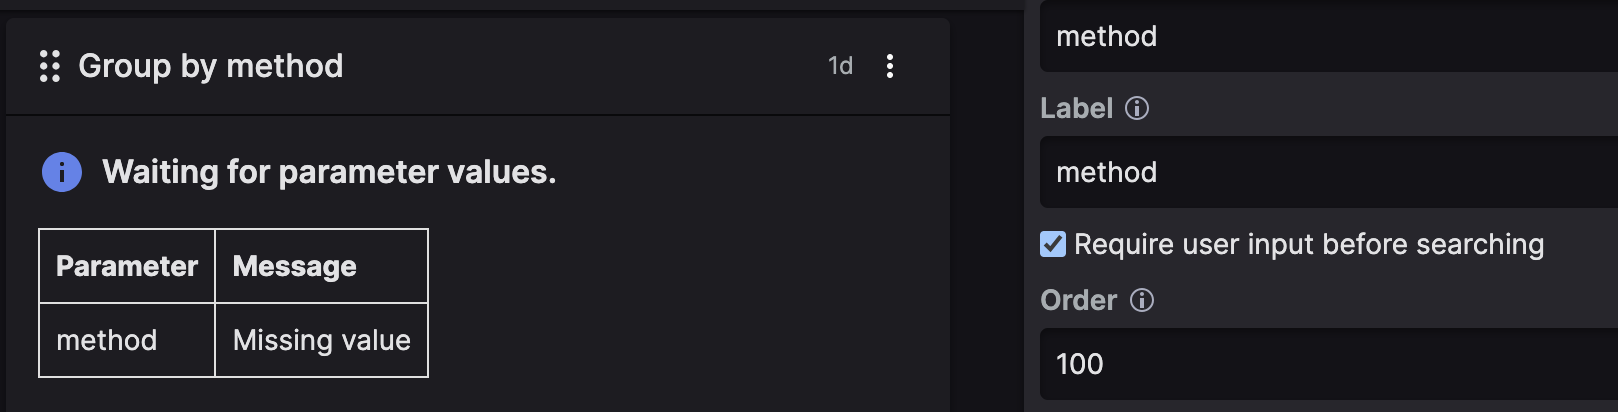
Figure 124. Required User Input
This setting can be useful in cases of long and complex queries — too expensive to run and returning a huge amount of data not meaningful for the purpose of the search.
For example, you may want to run a query limited to a certain group of emails from your data: you can do this by setting an
?emailparameter and then run the search only when certain email domains are entered as input for that parameter.If this setting is unchecked, you need to specify the default value used in the queries on the page load. You can use wildcards like
*to use all values.Default Value — allows you to set the default value the parameter should have. You might want to set, for example,
productionfor an?environmentparameter. Use the wildcard*as the default to match everything, which means no filtering.Order — controls the order of parameters on the dashboard page. Lower values will bring the parameter to the first positions on the list. For example,
1or100.Other settings specific to different parameter types. For details on these settings, see Parameter Types.
Click , or if you need to set a new configuration.
Whenever you need to remove all settings from the parameter you've configured, re-open it with the cog icon and click .
Parameter Types
While you are Configuring Dashboard Parameters, you can choose one of the following parameter types from the Parameter Type dropdown menu:
— allows you to just type a free text input as the value you want to filter or aggregate.
— creates a dropdown list of values based on the results of the query. The dropdown list is created as single or multiple choice, depending if the parameter is single or multi-valued (see examples of both at Examples of Parameterized Dashboards).
On top of the settings common to all parameter types, other settings specific to the parameter are:
Query String — must contain a LogScale query. This is a mandatory field. For example, you may want to fill in this field in conjunction with an aggregate function. See some examples of parameters used in queries at Examples of Parameterized Dashboards.
Dropdown Value Field — is the field in the results that should be used as the value for items. For example,
userId. This is a mandatory field.Dropdown Text Field — is the field in the results that should be used as the display text of items. For example,
email.Search Interval — sets how far back in time to search for values. This is always relative to the current time. For example,
5m,2h. This is a mandatory field.Use Dashboard Search Interval checkbox — makes the query for this parameter use the same time interval selected for the dashboard.
— provides a fixed set of options, it is good when you have a small set of fixed values that will fit into a dropdown menu. If there are too many values to use this parameter type, however, the parameter may be a better fit.
On top of the settings common to all parameter types, other settings specific to the parameter are:
Values — List of comma-separated values. For example,
server1,server2,server3. This is a mandatory field.Labels — List of comma-separated labels to name a value. For example,
Prod,Test,Staging.
— LogScale supports uploading of CSV and JSON files for use with the
match()function in queries, but those same files can also be used for populating parameters.On top of the settings common to all parameter types, other settings specific to the parameter are:
File — Insert the name of a file. This is a mandatory field.
Value Field — The field in the file that should be used as the value, e.g.,
userId. This is a mandatory field.Label Field — The field in the file that should be used as the display text of items, e.g.,
email. Allows you to configure the values that will appear in the Web UI when you select the value for the parameter, but it is still the value field that determines what data goes in the query. If no labeling field is configured, the Web UI will display the actual values.Value Filters — Limit entries coming from the file by configuring some fields e.g., country, with a certain value e.g.,
Germany. Parameters can be used as values, and multiple values can be specified, separated by comma.
Take this configuration as an example:
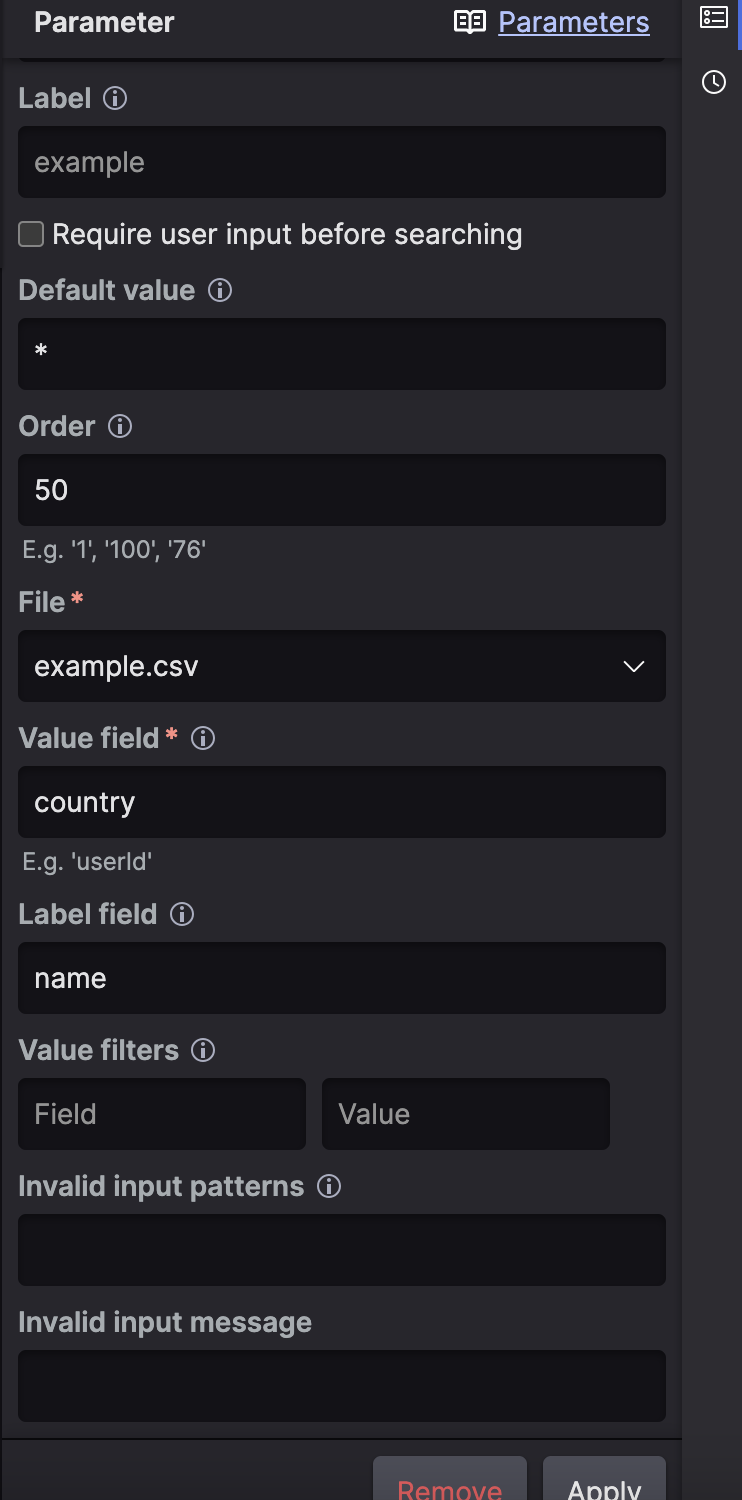
Figure 125. File Based Parameter Configuration
If
example.csvhas these contents:csvuserid,name,country 1,alice,us 2,bob,ukThen using the parameter in the dashboard looks like this:
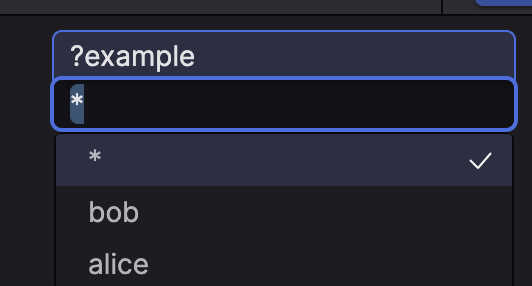
Figure 126. File Based Parameter Output
Selecting the
aliceoption will insert the value1into the parameter, and the same forboband2.We can also use the Value Filters configuration to hide entries from the output. Since
example.csvalso contains acountrycolumn, we can specify that we only want users from, for example, the USA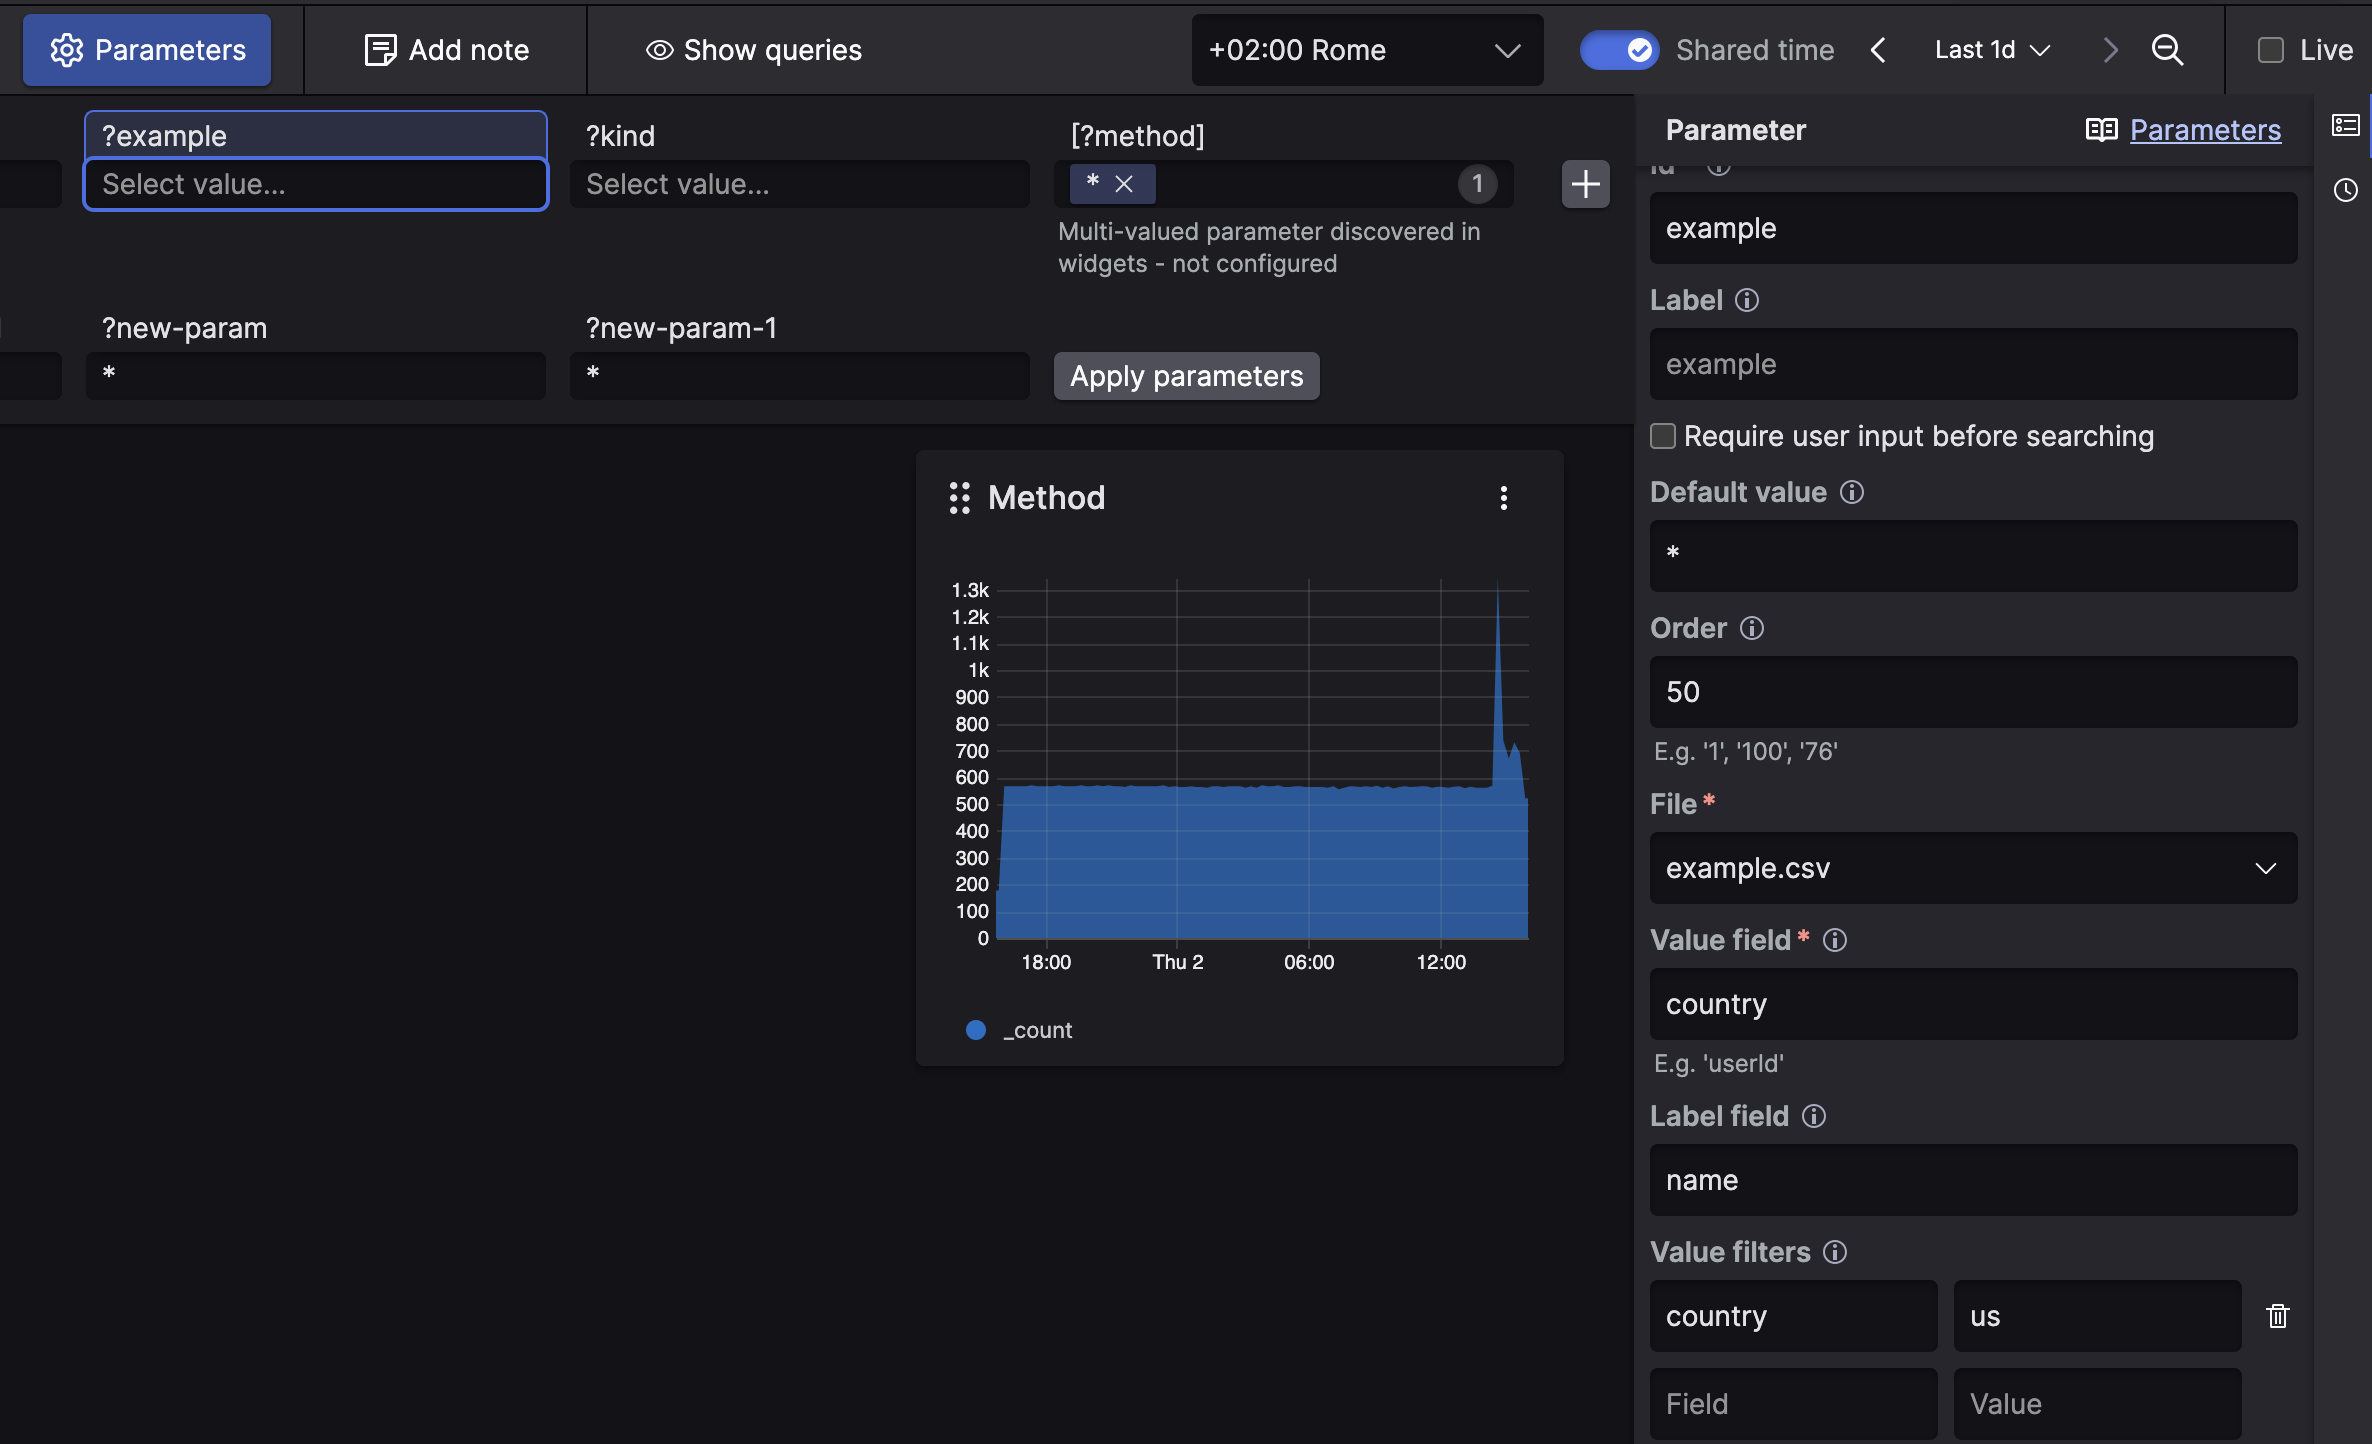
Figure 127. File Based Parameter with Static Filter
This would remove
bobfrom the output, but we can also specify multiple values, separated by comma, or use a parameter as input. Using a parameter is the same as writing out the options yourself, but you type, for example,?countryinstead ofus, and you will get the appropriate options:
Figure 128. File Based Parameter with Dynamic Filter and Output
URL
When parameters are assigned, they will be added to the URL and you can share a link to a dashboard configuration simply by sharing the URL of what you are looking at.
This can also be used to integrate with other systems, where you can construct dashboard URLs that contain parameters. This could for instance be an IP found in an external system that you want to look at logs for on a dashboard.
Notice that URLs use the syntax
dashboards/<dashboard-id>?$param1=value1&$param2=value2
where parameters are denoted with the $ sign instead of the
? (like you use in queries). This is because ?
is a reserved character in URLs.
Tip
Use Dashboard Link Interactions to bind values from the data to parameters for a dynamic integration with related LogScale dashboards.
Examples of Parameterized Dashboards
Single-value Parameters
Let's take an example where you want to create a dashboard that monitors status codes for the different hosts available in the data, and you want to match these codes within a certain range — subnet — of these hosts. Let's assume that events are attributed with the following fields:
host — the hostname of the server.
status_code — the status code of the entry, such as
200.
Go to the Search tab from the top menu bar and enter a query like the one below:
logscalecidr(host,subnet=?Subnet) | status_code > ?StatusCode | groupBy(host)The query contains two parameters:
?Subnet, and?StatusCode.Run the query to produce a
Bar
              Chart
widget with one series per subnet host, counting how many errors occur.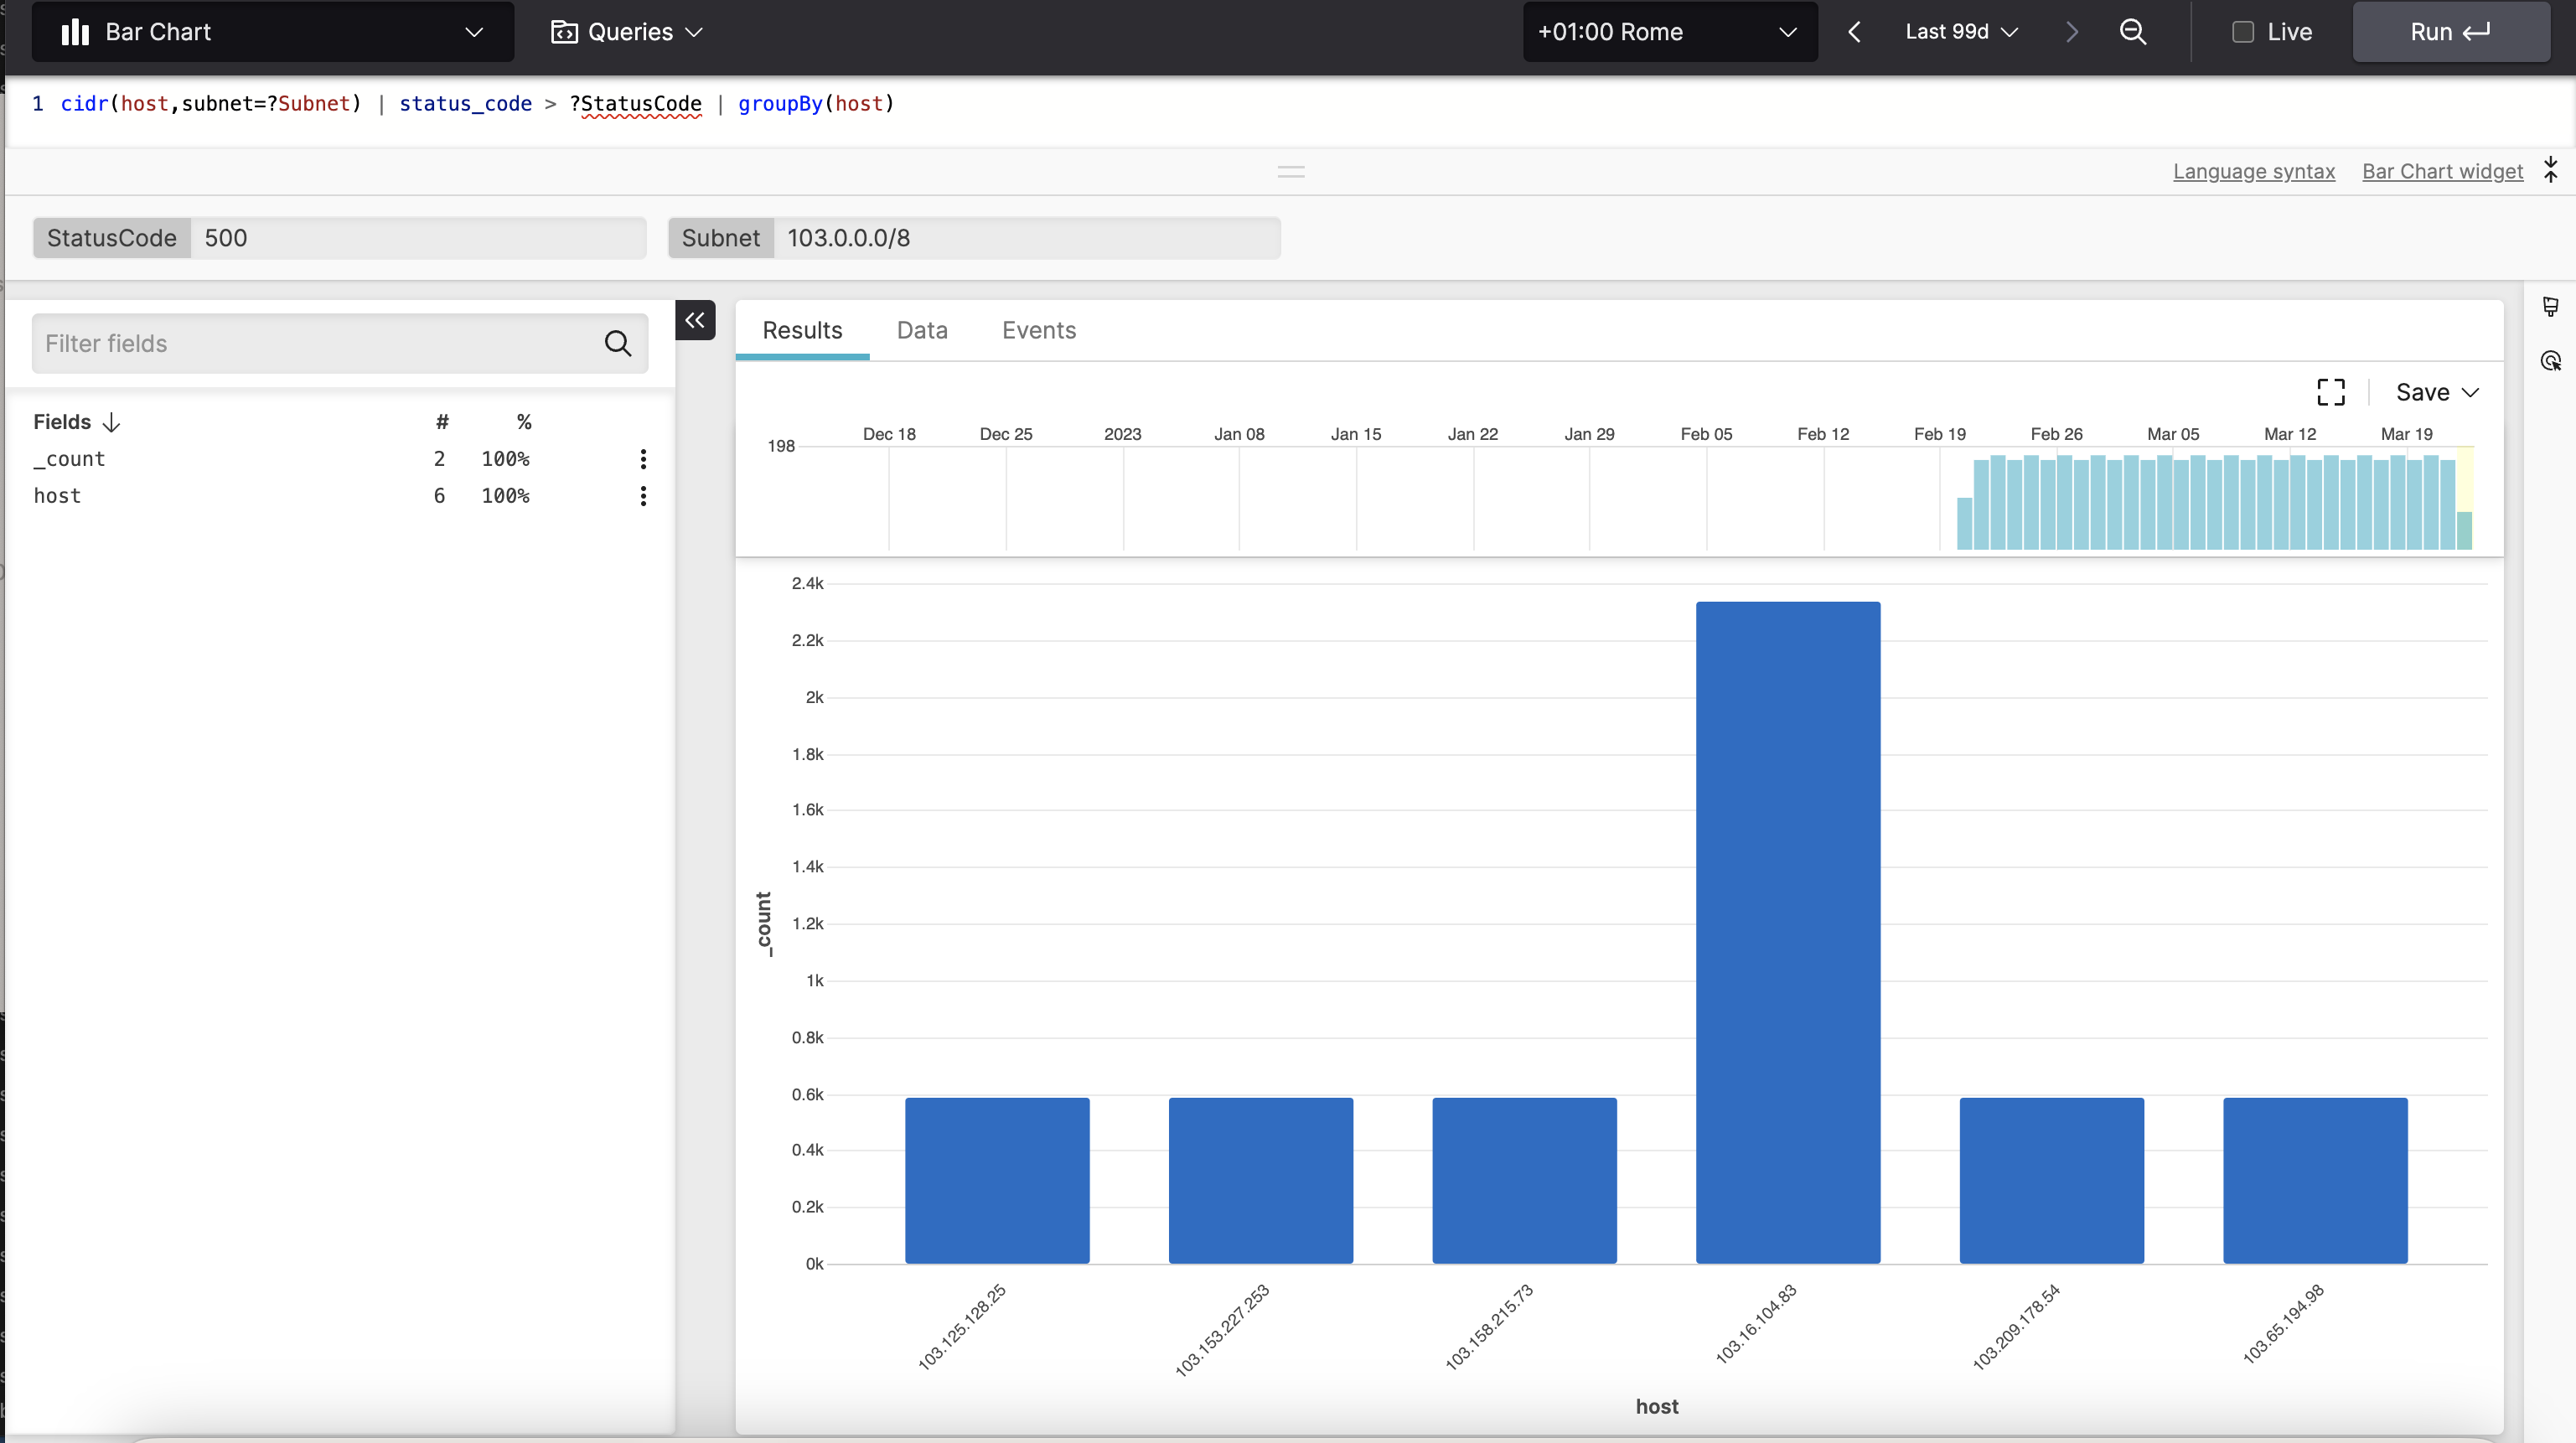
Figure 129. Parameters in a Query
Set the
?StatusCodeparameter to500, and the?Subnetparameter to103.0.0.0/8for example, and run the query again to show results for only those hosts having registered a500status code in that specified subnet.
You can also set one of the two parameters to * as its
default value, meaning that it matches everything, e.g. all status
codes.
The above is an example where ?Subnet, and
?StatusCode are used as single-value parameters that is,
you can input just one value for those parameters.
Multi-value Parameters
You can use multivalued parameters to select more options from a list of available values:
 |
Figure 130. Multivalue Parameters Selection
The example in Figure 130, “Multivalue Parameters Selection” is produced from the query:
in(field=loglevel, values=[?loglevels])
Any parameter becomes multi-value whenever it is used inside brackets
in a query — that is, in an array — like the parameter
?loglevels in the example query above. This will allow
submitting the values of the loglevel field e.g.,
INFO and WARN in the
parameter.
When the query is executed, the selected values are combined in the query into a comma-separated string. Using the same example, the query becomes:
in(field=loglevel, values=["INFO", "WARN"])Note
If the same parameter is used in two queries in a dashboard — once as a single value and once as a multi-value — we will treat it as a single value to keep it compatible with both queries.
In the example below, ?loglevel will be displayed as a
standard single-value parameter, because the second query does not
use it inside an array:
in(field=loglevel, values=[?loglevels])loglevel=?loglevel
| groupby(loglevel)
Another example of query serving well for a multi-value parameter
would use the field method with its values
counted in a groupBy:
in(method, values = [?method])
| groupBy([method])
With GET and POST
selected for the ?method parameter in a
Bar Chart widget for instance, the
query will be executed as:
in(method, values = ["GET", "POST"])
| groupBy([method])
and will produce a visualization limited to the selected methods:
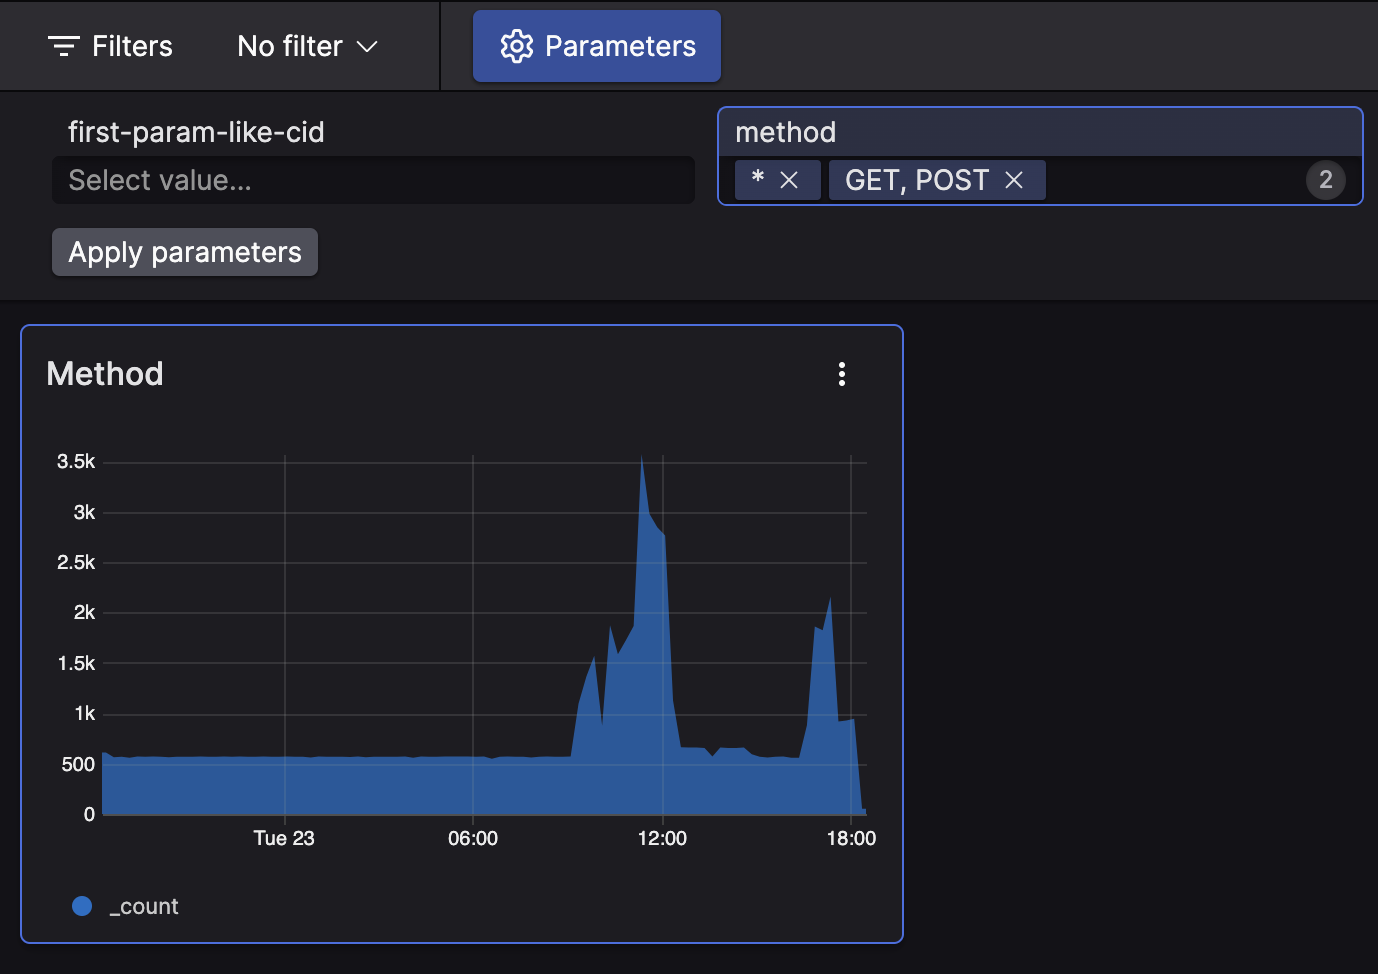 |
Figure 131. Widget with Multivalued Parameter
Parameters with Regex
A parameter can only be assigned a fixed value, the value from a parameter cannot be used within a regex, for example:
/error="?error"/i
One way to work-around this is to use the parameter as the entire
regex to the regex() function:
regex(?regex, field="message")In the above example we use a parameter to represent the string used as a regular expression that is matched against the field message.
You also cannot provide an array:
["foo","bar"]Or a subquery
foo AND barParameters with Aggregate Query Functions
Usually you will want to fill in the
Query String field with a
LogScale query that uses an aggregate function like
top() and find the most frequent values that
appear in a certain field. For example, you could find all hosts in
your production cluster using:
env=PROD
| top(host)
You will need to then set host as the value in
Dropdown Value Field, meaning it is the
value of this field (host) in the search results
from the query env=PROD | top(host) that should be bound
to the parameters.
Using top() like in the example above is useful
to get the most frequent values. If instead you want all possible
values from the data, you can use the groupBy()
function to get those values.
The most efficient way to do so is by calling
groupBy() with no aggregation function, using:
groupBy(fieldName, function=[])
This will make groupBy() just gather the unique
values without doing any operations on those values (like counting how
many times they occur).
You can use the same parameter names in different queries for different widgets, so that the parameters shown in the dashboard will apply to any widget in that dashboard.
Parameters with Case-Insensitive Searches
Parameters can be used in case-insensitive searches; in the example
below the field Username is filtered based on the
inputUserName parameter value:
| inputUserName := ?parameterUserName
| test(lower(inputUserName) == lower(UserName))