
AWS Cloud Reference Deployment and Automation
This guide provides information on using the LogScale Reference Automations for AWS. The Github repository with the automations is available here: https://github.com/CrowdStrike/logscale-aws.
Note: It is recommended to follow
LogScale Kubernetes Reference Architecture document and decide how running
LogScale fits into your infrastructure.

Prerequisites
The following prerequisite compoentns are required before installation:
Deployed versions
Humio Operator - 0.21.0
cert-manager - v1.14.4
Nginx-ingress - 4.10.0
EKS Kubernetes - 1.27 (The minimum supported Kubernetes version supported by the Humio Operator can be found on this Version Matrix)
Humio container image - humio/humio-core:1.131.1
Tooling
Requirements
Before using this guide, the following requirements must be met:
CPU Architecture
As of now, Humio
Operator only supports the x86_64/amd64 CPU
architecture. Therefore, using Graviton CPU instances
in AWS will not work for LogScale.
Bucket Storage
AWS provides NVMe storage in the form of local SSDs, which are directly attached to the virtual machine instances. Local SSDs offer high Input/Output Operations Per Second(IOPS) and low latency. When utilizing ephemeral instances bucket storage is required for a production environment as it acts as the persistent storage for the cluster.
Kubernetes
The minimum Kubernetes version supported by the Humio Operator, see Version Matrix.
Kafka
LogScale relies on Kafka as a fault tolerant event bus and internal cluster communication system. You must have an available Kafka cluster before deploying LogScale.
AWS MSK is a great option for this, and a provisioning can be done using the provided terraform components code.
TLS
By default the Humio Operator utilizes cert-manager to create an internal certificate authority for use by the LogScale cluster. In addition, support for provisioning certificates for external connectivity can be used in conjunction with cert-manager's external issuer support. If LogScale is configured to expose its APIs using HTTPS, which is the default, LogScale assumes Kafka connectivity will also utilize TLS, this is configurable. In some environments that employ service meshes that implement TLS or mTLS, TLS support can be disabled completely.
Nginx Ingress
The humio-operator contains one built-in ingress implementation, which
relies on
ingress-nginx
to expose the cluster to the outside of the Kubernetes cluster. The
built-in support for
ingress-nginx
should be seen mostly as a good starting point and source of inspiration,
so if it does not match certain requirements it is possible to point
alternative ingress controllers to the Service
resource(s) pointing to the cluster pods. The built-in support for
ingress-nginx
only works if there is a single node pool with all nodes performing all
tasks.
SSD RAID 0 setup
As long as we use Kafka (MSK) and bucket storage with our LogScale cluster, using RAID 0 on our Kubernetes workers is a safe option for ensuring very fast data processing, as long as Kafka is stable and bucket storage is working. To achieve a RAID0 setup. We're using AWS's i4i instances, coupled with TopoLVM for an easier volume management.
Quickstart Guide
The following guide explains how to quickly set up a LogScale cluster in AWS using the Humio Operator. We will create the required AWS resources, install the Humio Operator, and setting up a simple LogScale cluster, all in a couple of easy steps using Terraform. For production installations, it is recommended to follow the full AWS Installation Guide and Reference Architecture and decide how running LogScale fits into your infrastructure.
AWS Quickstart Guide - Prerequisites
Quickstart requires the following tooling:
For authentication and permissions, ensure that you are logged into the AWS through the terminal and have the necessary permissions to create resources such as EKS and MSK clusters and S3 buckets. For additional AWS authentication options, see the authentication section of the terraform AWS provider documentation.
Installation
To use the automations:
Clone the LogScale AWS repo, which contains all the needed automations.
shellgit clone https://github.com/CrowdStrike/logscale-aws cd logscale-awsExport the LogScale license as a Terraform environment variable:
shellexport TF_VAR_humiocluster_license=<your_logscale_license>Setup the
zone_namein the terraform.tfvars file. The zone name should be a Route53 zone of your choice, created before applying the following steps.Create an S3 bucket to hold the Terraform state, along with a DynamoDB table for state locks and edit the
backend "s3"block in/versions.tfas such:backend "s3" { bucket = <state_s3_bucket_name> key = "state/terraform.tfstate" region = <aws_region> dynamodb_table = <dynamodb_table_name> encrypt = true profile = <aws_profile> }Initialize Terraform and apply the AWS Resources.
$ terraform initCreate and switch to a new Terraform workspace:
$ terraform workspace new <workspace_name>
$ terraform workspace select <workspace_name>
Apply the Terraform resources
shell$ terraform apply -var-file terraform.tfvars -target module.vpc -target module.msk -target module.eksAfter the previous apply completed, an EKS cluster will be up and running. Next we will install the required CRDs in EKS using the following command.
shell$ terraform apply -var-file terraform.tfvars -target module.crdsOnce the CRDs are installed, the EKS cluster is ready to host the Humio Operator. Run the next command to install the LogScale Operator and configure a basic LogScale cluster.
shell$ terraform apply -var-file terraform.tfvars -target module.logscaleFinally, we'll check the status of the LogScale cluster by running
shell$ kubectl get humiocluster -n logging -wInitially the cluster will go into the state Bootstrapping as it starts up, but once it starts all nodes it will go into the state of Running.
Access the cluster using the URL:
https://aws.<your_route53_zone_name>
Sending Data to the Cluster
To send data to the cluster, use the following section in our AWS Architecture.
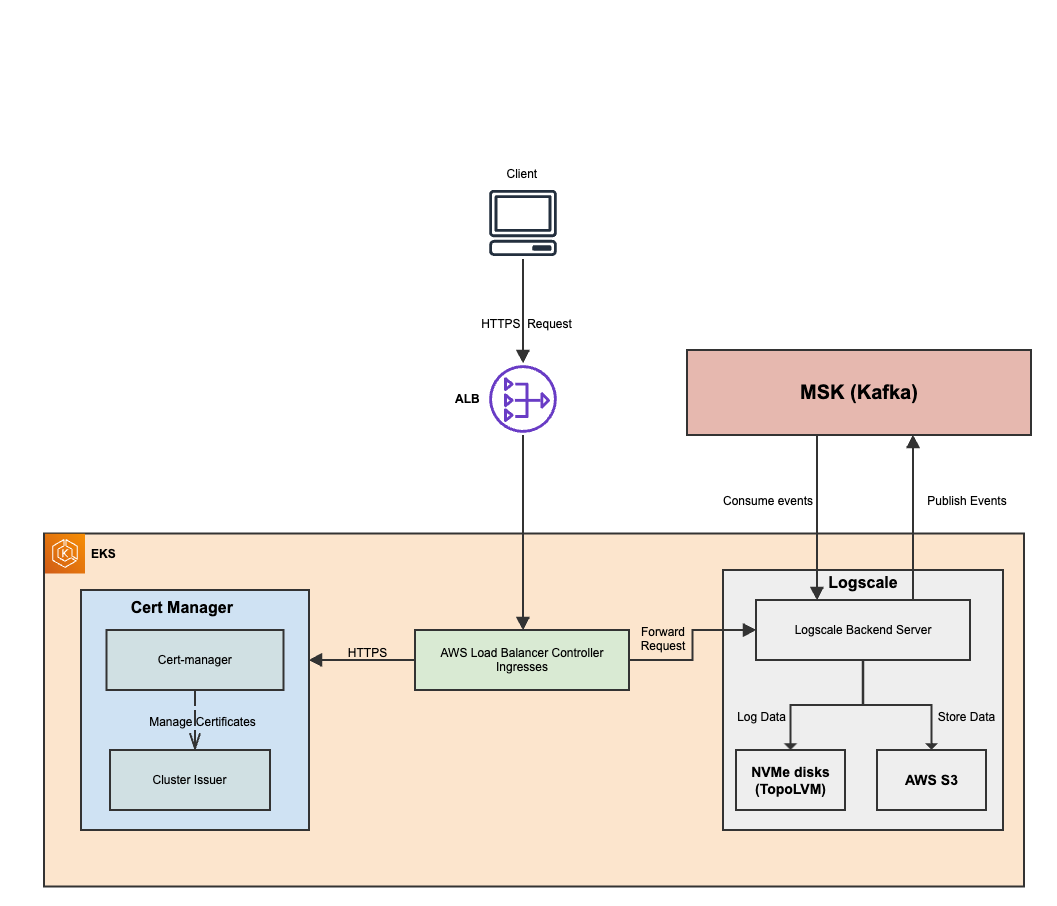
AWS Architecture
Private EKS cluster:
Private clusters offer increased isolation by utilizing private IP addresses for nodes and providing private or public endpoints for control plane nodes, which can be further isolated. With private clusters, we can still access AWS APIs through while Pods are segregated from both inbound and outbound communication, establishing a cluster perimeter. The directional flows of these communications can be managed by exposing services through load balancing and a NAT Gateway.
SSM:
The worker nodes can be access via AWS Systems Manager via the AWS management console
Cert Manager and Let's Encrypt issuer:
Cert Manager is a popular Kubernetes tool used for managing the TLS certificates. It is combined with Let's Encrypt issuer to automate the process of obtaining and renewing SSL/TLS certificates for LogScale application. Cert Manager is responsible for certificate management within the EKS cluster, it can generate renew and keep track of TLS certificates. Let's encrypt is a certificate authority that provides TLS/SSL certificates.
NAT Gateway:
To enable outbound internet connectivity for the pods within the private EKS cluster, you can set up a NAT Gateway in your VPC. A NAT Gateway translates the private IP addresses of the pods to public IP addresses, allowing them to access the internet. It's configured for LogScale egress traffic.
Data Flow:
Instance Sizing
When sizing LogScale, your choice depends on your usage patterns, so we recommend first doing an example setup to see how LogScale works with your data. Examples of recommended deployment configurations are documented in Instance Sizing.
| TB/day | Cluster Size | Digest Nodes | Digest Machine Type | Ingress Nodes | Ingress Machine Type | Ingest Nodes | Ingest Machine Type | UI Nodes | UI Machine Type | Kafka Nodes | Kafka Machine Type | Kafka Disk Size |
|---|---|---|---|---|---|---|---|---|---|---|---|---|
| 1 | xsmall | 3 | i4i.2xlarge | 3 | c5.xlarge | 3 | c5.xlarge | 3 | c5.xlarge | 3 | kafka.m5.large | 152GB |
| 5 | small | 9 | i4i.2xlarge | 6 | c5.2xlarge | 3 | c5.2xlarge | 3 | c5.2xlarge | 6 | kafka.m5.xlarge | 376GB |
| 25 | medium | 21 | i3en.3xlarge | 12 | c5.4xlarge | 6 | c5.4xlarge | 6 | c5.4xlarge | 9 | kafka.m5.4xlarge | 8000GB |
| 50 | large | 42 | i3en.12xlarge | 18 | c5.9xlarge | 9 | c5.9xlarge | 9 | c5.9xlarge | 9 | kafka.m5.8xlarge | 2504GB |
| 100 | xlarge | 78 | i3en.12xlarge | 36 | c5.12xlarge | 18 | c5.12xlarge | 18 | c5.12xlarge | 18 | kafka.m5.16xlarge | 2504GB |
All the specific values for a particular size are described within the
cluster_size.tpl file.
Cluster types
There are 3 types of LogScale cluster types:
Basic: Will deploy one node pool
logscale-nodepoolwhich will host a LogScale cluster whose nodes accomplish all roles and can perform any function within the cluster. This cluster type is fit for xsmall clusters or PoC/demo clusters.Ingress: Will deploy two node pools, one which performs all roles
logscale-nodepool, and one which performs thehttponlyrolelogscale-ingress-only-nodepool. This cluster type can handle cluster sizes up to medium.Internal-Ingest: Will deploy three node pools, one which performs all roles
logscale-nodepool, one which performs thehttponlyrolelogscale-ui-nodepool), and one which performs theingestonlyrole (logscale-ingest-only-nodepool). This is the recommended solution for large and xlarge LogScale clusters.
Selecting the appropriate cluster type is important, as going with a complex type such as Internal-Ingest for a small cluster will significantly increase the costs, while going with the basic type for a large cluster can create performance issues.
Terraform Components
The Terraform configuration sets up essential AWS infrastructure and services to support the deployment of LogScale.
The default Terraform backend configuration is using an S3 bucket for state storage, along with a DynamoDB table for state locking, allowing multiple engineers to safely work on the same infrastructure. Workspace support is also used for the S3 bucket state key so before applying the Terraform configuration, make sure to create and switch to a new Terraform Workspace using these commands
Initialize a working directory containing terraform configuration file.
terraform initCreate a new terraform workspace if it does not exist and switch to your new workspace.
terraform workspace new <workspace_name>
terraform workspace select <workspace_name>
You will also be required to supply the LogScale license key as a Terraform environment variable.
export TF_VAR_humiocluster_license="<LogScale License Key>"Amazon Web Services
Setting up Amazon Web Services
VPC (Virtual Private Network) Module
The VPC module creates a VPC with private, public, and intra subnets across three availability zones. It sets up a NAT gateway for internet access for instances in private subnets and enables DNS hostnames. Additionally, it configures security groups to allow internal traffic within the VPC and creates a specific security group for MSK (Managed Streaming for Apache Kafka) with appropriate ingress rules.
Key Components:
Availability Zones: Defines three availability zones for redundancy and high availability.
Subnets: Creates private, public, and intra subnets within the specified VPC CIDR block.
NAT Gateway: Ensures that instances in private subnets can access the internet.
DNS Hostnames: Enables DNS hostnames for instances within the VPC.
Security Groups: Configures security rules to allow internal traffic within the VPC. I
It also sets the security group
msk_sgwith specific ingress rules to allow unencrypted TCP and encrypted TCP traffic on the ports used by the Kafka brokers.
MSK (Amazon Managed Streaming for Kafka) Module
The MSK module sets up a Kafka cluster within AWS, providing a managed and scalable streaming platform for real-time data processing for logs ingested by LogScale. It specifies the Kafka version, number of broker nodes, instance types for the brokers, along with other features like using a KMS key for encryption of data at rest, as well as encryption in transit using TLS.
Key Components:
KMS Key: Creates a KMS key for encryption of data at rest.
MSK Cluster: Configures the Kafka cluster with specified settings, including the number of broker nodes, instance types, and security configurations.
S3 bucket: Stores MSK logs
EKS (Elastic Kubernetes Service) Module
The EKS module provisions a Kubernetes cluster within AWS.
Key Components:
ACM CertificateManages SSL/TLS certificates to enable secure and encrypted communication between the LogScale service exposed by ingress and the client sending logs. This includes creating and validating an ACM certificate using DNS validation, with the certificate lifecycle managed to ensure it is always available.
IAM Roles
Configures and manages the following IAM roles and policies for EKS and associated services:
logscale-${cluster_name}:Assumed by the main service account
${var.cluster_name}-humio, allowing it to store and retrieve segment files from the S3 bucket.The IAM role
logscale-${var.cluster_name}is created with the necessary policies to interact with the S3 bucket and KMS keys.Policy includes permissions for
s3:ListBucket,s3:PutObject,s3:GetObject,s3:DeleteObject,kms:GenerateDataKey, andkms:Decrypt.
AmazonEKS_LoadBalancer_Controller_Role-${var.cluster_name}:Assumed by the Load Balancer Controller service account aws-load-balancer-controller.
Created using the
terraform-aws-modules/iam/aws//modules/iam-role-for-service-accounts-eksmodule.Includes the necessary policy to manage AWS load balancers.
AmazonEKS_EBS_CSI_DriverRole_${var.cluster_name}:Assumed by the EBS CSI Driver service account
ebs-csi-controller-sain thekube-systemnamespace.Allows the EBS CSI Driver to interact with EBS volumes.
External_DNS_${var.cluster_name}:Assumed by the external-dns service account in the kube-system namespace.
Allows ExternalDNS to manage DNS records in Route53.
The policy
AllowExternalDNSUpdatesgrants permissions forroute53:ChangeResourceRecordSets,route53:ListHostedZones,route53:ListResourceRecordSets, androute53:ListTagsForResource.
EKS Cluster
Sets up the EKS (Elastic Kubernetes Service) cluster with necessary configurations, including managed node groups configuration, worker nodes, add-ons, Kubernetes version, etc. Each managed group has a customizable number of worker nodes.
logscale: Nodes that host the Humio-core pods (all deployments).logscale-ingress: Nodes that host the ingress pods (ingress deployment only).logscale-ingest: Nodes that host the ingest-only-core pods (internal-ingest deployment only).logscale-ui: Nodes that host the UI-only-core pods (internal-ingest deployment only).
S3 Bucket
The S3 bucket for LogScale logs is configured using the Terraform S3 module that ensures secure storage and proper management of log data. Depending on whether a bucket prefix is specified, the bucket name will either use var.s3_bucket_prefix or default to var.cluster_name. The bucket is set to private, enforces object ownership to the bucket owner, and allows forced deletion even if objects are present. Additionally, lifecycle rules are in place to expire noncurrent object versions after one day, aiding in cost management and data hygiene.
Kubernetes Components
CRDs
The CRDS Terraform module installs the necessary Custom Resource Definitions (CRDs) for both Cert-Manager and LogScale withing the EKS cluster. It retrieves the CRD manifests from specified URLs, decodes them, and applies them to the Kubernetes cluster. Additionally, it includes a provisioner to wait for the CRDs to be applied before proceeding to ensure proper setup. The CDR deployment follows the same steps for both services.
Data Retrieval: The CRD YAML file is fetched from a specified URL.
YAML Decoding: The fetched YAML content is split into individual documents and decoded.
CRD Application: Each decoded CRD manifest is applied to the Kubernetes cluster using the kubernetes_manifest resource.
Waiting Period: A 30-second wait period ensures that all Custom Resource Definitions (CRDs) are fully applied and propagated within the Kubernetes cluster before any dependent operations proceed. This waiting period acts as a buffer to allow the cluster to stabilize after the CRD application, reducing the risk of race conditions or incomplete resource recognition. By enforcing this delay, the null_resource helps guarantee that subsequent Terraform operations can reliably interact with the newly installed CRDs.
Configuring LogScale
Cert-Manager
Cert-manager is a pre-requisite for LogScale, deployed as a Helm chart in its own namespace. It includes the Cert-Manager ClusterIssuer, a Kubernetes add-on that automates the management and issuance of TLS certificates from various issuing sources, such as Let's Encrypt.
This section deplys the following Kubernetes resources:
CustomResourceDefinition Check:
Verifies if the ClusterIssuer CRD has been applied in the Kubernetes cluster to ensure cert-manager can create and manage issuers.
Namespace Creation:
Creates a dedicated namespace for cert-manager to organize and isolate its resources.
Cert-Manager Deployment:
Deploys the cert-manager Helm chart in the specified namespace, configuring it with default issuer settings using Helm values.
ClusterIssuer Configuration:
Defines a ClusterIssuer resource using cert-manager to automate the issuance of TLS certificates. This resource is configured for ACME protocol with Let's Encrypt as the certificate authority, specifying the email, private key secret reference, and HTTP-01 challenge solver.
Configuring Data Ingress
The Ingress leverages the AWS Load Balancer Controller service, a Kubernetes controller that integrates with Amazon Elastic Kubernetes Service (EKS) to manage AWS Elastic Load Balancers (ELB) for Kubernetes applications. It supports both Application Load Balancers (ALB) and Network Load Balancers (NLB), automating the creation and management of load balancers for services running within a Kubernetes cluster. The controller watches Ingress resources and services within the Kubernetes cluster, provisioning and configuring the necessary ALB based on defined Ingress resources to route external traffic to Kubernetes services.
This section deploys the following resources:
AWS ELB Ingress Controller:
Kubernetes Service Account: Creates a Kubernetes service account for the AWS Load Balancer Controller with the necessary IAM role annotation.
Helm Deployment: Deploys the AWS Load Balancer Controller using Helm, configured with the cluster name and service account.
ExternalDNS Helm Deployment: Deploys ExternalDNS using a Helm chart to manage DNS records for Ingress resources, with configurations for AWS, region, zone type, and service account annotations.
NodePort Services and Ingresses:
LogScale Basic Cluster Type:
NodePort Service: Creates a NodePort service for the LogScale basic cluster type.
Ingress Resource: Configures an Ingress resource to route external traffic to the NodePort service using an internet-facing ALB, with annotations for HTTPS, backend protocol, health checks, and ExternalDNS settings, including:
shellexternal-dns.alpha.kubernetes.io/hostname = ${var.hostname}.${var.zone_name}This annotation allows ExternalDNS to create a DNS record that points to the ALB associated with the Ingress.
LogScale Ingress Cluster Type:
NodePort Service: Creates a NodePort service for the LogScale ingress-only cluster.
Ingress Resource: Configures an Ingress resource to route external traffic to the NodePort service using an internet-facing ALB, with annotations for HTTPS, backend protocol, health checks, and ExternalDNS settings, including:
shellexternal-dns.alpha.kubernetes.io/hostname = ${var.hostname}.${var.zone_name}This annotation allows ExternalDNS to create a DNS record that points to the ALB associated with the Ingress.
LogScale UI:
NodePort Service: Creates a NodePort service for the LogScale UI-only cluster type.
Ingress Resource: Configures an Ingress resource to route external traffic to the NodePort service using an internet-facing ALB, with annotations for HTTPS, backend protocol, health checks, and ExternalDNS settings, including:
shellexternal-dns.alpha.kubernetes.io/hostname = ${var.hostname}.${var.zone_name}This annotation allows ExternalDNS to create a DNS record that points to the ALB associated with the Ingress.
LogScale Ingest Cluster:
NodePort Service: Creates a NodePort service for the LogScale internal-ingest cluster type.
Ingress Resource: Configures an Ingress resource to route internal traffic to the NodePort service using an internal ALB, with annotations for HTTPS, backend protocol, health checks, and TLS settings.
A TLS certificate is configured for the Ingress using cert-manager, ensuring secure communication for the Ingress resources. This setup provides a comprehensive ingress solution for the LogScale application, leveraging AWS Load Balancer Controller and ExternalDNS for dynamic and scalable traffic management, including automatic DNS record creation in Route 53 with the specified ExternalDNS annotations to point to the ALBs associated with the Ingresses.
Deploying LogScale (logscale-1)
This section of the Terraform EKS module is responsible for deploying the LogScale application and the necessary Kubernetes resources. The configuration ensures the correct namespace, operators, secrets, and pods are set up to run the LogScale application efficiently. The following tasks are performed:
Namespace Creation:
Creates the logscale namespace where all related Kubernetes resources will be deployed.
Humio Operator Installation:
Installs the Humio operator in the logscale namespace using a Helm chart. The operator manages the deployment and lifecycle of the LogScale application.
The Humio operator is configured with specific settings for liveness and readiness probes, and any additional values provided in
var.humio_operator_extra_values.Secrets Management:
LogScale License: Creates a Kubernetes secret containing the LogScale license key
${var.cluster_name}-license.S3 Encryption Key: Generates a random encryption key
${var.cluster_name}-s3-storage-encryptionfor securing data in the S3 bucket and stores it as a Kubernetes secret.Admin Password: Generates a random password
${var.cluster_name}-single-user-passwordfor the admin user and stores it as a Kubernetes secret.
LogScale Application Deployment:
Deploys the LogScale application pods based on the specified cluster type (basic, ingress, internal-ingest), with configurations for node affinity, pod anti-affinity, persistent volume claims, and environment variables.
Configures environment variables to integrate with external services such as S3, Kafka, and ZooKeeper, ensuring proper security and data encryption settings.
Uses TopoLVM for managing the persistent volumes, enabling dynamic provisioning and volume expansion.
Specifies node roles and additional configurations for each node pool type (e.g., ingest-only, ui-only).
Storage Configuration:
Creates persistent volume claims (PVCs) with the gp2 storage class, ensuring the dynamic provisioning of storage volumes managed by gp2.
Cluster Types:
Differentiates between various LogScale cluster types to ensure appropriate resource allocation and configurations for each type, including node pools and specific roles for nodes (e.g.,
ingestonly,uionly, or basic).
Persistent Volumes
The LogScale application uses persistent volumes managed by gp2 for dynamic volume provisioning.
The humio cluster resources assume that disks are prepped on the underlying Kubernetes worker nodes. We utilize RAID0 on the local SSDs provided by AWS's i4i instances, in combination with bucket storage. As long as Kafka is stable and bucket storage is functioning, using RAID0 on individual Kubernetes workers is sufficient. gp2 simplifies disk space management for Kubernetes pods by providing dynamic volume provisioning using Logical Volume Management (LVM).
gp2 Storage Classes:
gp2 Controller Installation: Deploys the gp2 controller via a Helm release, configured using a values file for specific settings. This controller manages LVM for Kubernetes, enabling dynamic provisioning of storage volumes.
Persistent Volume Claims:
Data Storage: The persistent volume claims for LogScale data storage use TopoLVM as the storage class. This ensures that data volumes are dynamically provisioned and managed by TopoLVM, supporting encryption and volume expansion.
This setup provides a robust and flexible persistent storage solution for the LogScale application, leveraging TopoLVM for advanced volume management and dynamic provisioning.
ExternalDNS
In order to synchronize exposed Kubernetes Services and Ingresses with Route53, ExternalDNS is used. ExternalDNS automatically creates CNAME records in Route53, pointing the Ingress Application Load Balancer (ALB) to the LogScale UI Fully Qualified Domain Name (FQDN). This solution also ensures the created Application Load Balancers (ALBs) are properly cleaned up upon calling terraform destroy.
The configuration includes annotations in the Kubernetes Ingress resources, such as:
external-dns.alpha.kubernetes.io/hostname = ${var.hostname}.${var.zone_name}Allowing ExternalDNS to create DNS records that point to the ALB associated with the Ingress. ExternalDNS is deployed and configured using a Helm chart with settings for the provider, AWS region, zone type, service account, and necessary IAM roles.
This setup provides an automated and efficient DNS management solution for Kubernetes Ingress resources, ensuring seamless integration with Route53 and proper resource cleanup.
Accessing the cluster
There are two steps to getting the data in, configuring the DNS and accessing the LogScale user interface.
DNS
There should be a DNS CNAME record created on Route53 pointing directly to the Ingress Application Load Balancer. The LogScale URL is composed of the hostname + Route53 zone name. For a cluster of type internal-ingest, as an example, the ingress ending with ui-ingress is pointing to the internet-facing AWS Application Load Balancer. To find out the ingress and ALB respective names, run the following command:
k get ingress -n logging
NAME                           CLASS  HOSTS   ADDRESS                                                                  PORTS     AGE
cluster_name>-ingest-ingress   none   *       internal-k8s-logging-6a23961160-1639354112.us-west-2.elb.amazonaws.com   80, 443   42h
cluster_name>-ui-ingress       none   *       k8s-logging-0ef6576a8e-517396864.us-west-2.elb.amazonaws.com             80        42h
Logging In
Go to the LogScale URL on your browser. Since we are using static authentication mode, the single username will be admin and the password can be obtained by running:
kubectl get secret <cluster_name>-single-user-password -n logging -o=template --template={{.data.password}} | base64 -DIf you are running the above command on Linux, you may need to use base64 --decode.
Sending data to the cluster
There are two steps for getting data into the cluster:
Using LogScale UI
To send data to the cluster, we will create a new repository, obtain the ingest token, and then configure fluentbit to gather logs from all the pods in our Kubernetes cluster and send them to LogScale.
Create a repo using LogScale's UI:
Click on button and create a new repo

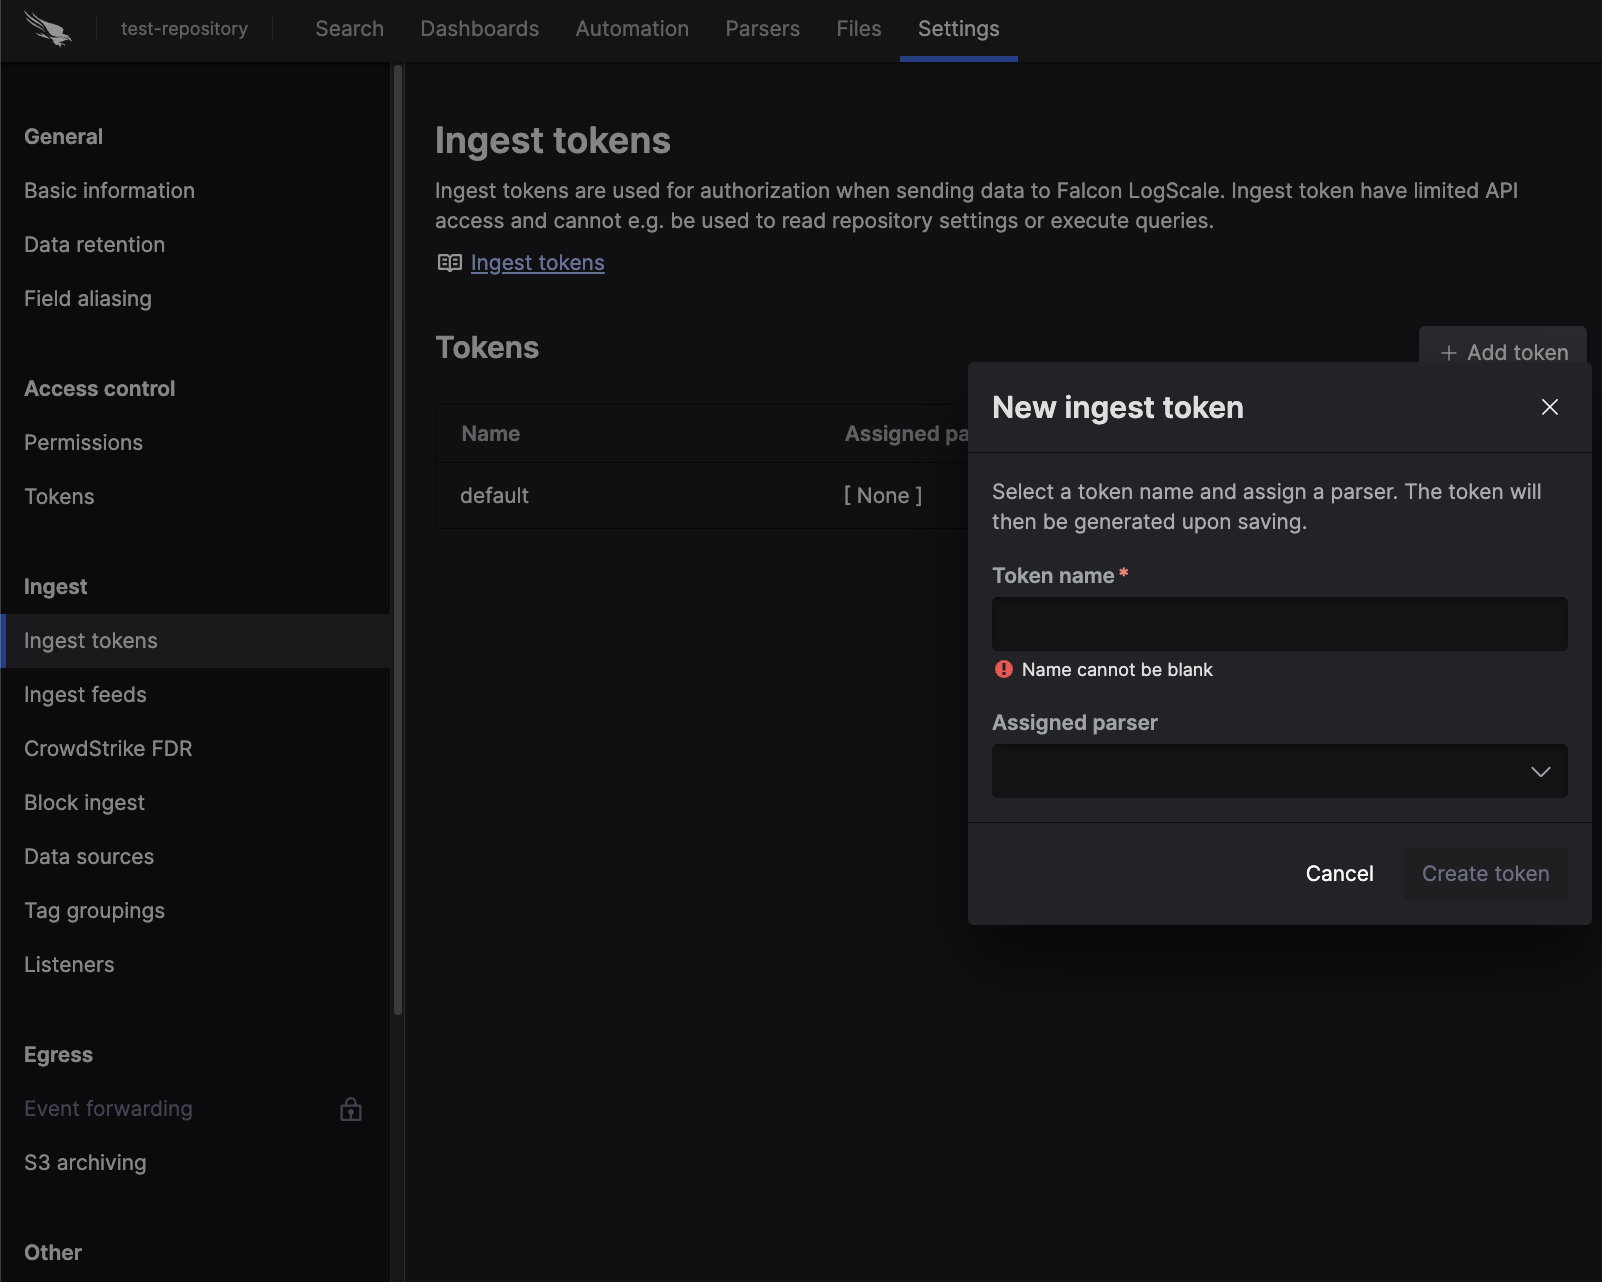
Create an ingest token:
Go to the test repo you've created and in the settings tab, select Ingest tokens and create a new Ingest token with any available parsers.
Ingesting logs into the cluster
Now we'll install fluentbit into the Kubernetes cluster and configure
the endpoint to point to our $INGRESS_HOSTNAME, and use
the $INGEST_TOKEN that was just created.
helm repo add humio https://humio.github.io/humio-helm-charts
helm repo update
Using a simple text editor, create a file named, humio-agent.yaml and copy the following lines into it:
humio-fluentbit:
  enabled: true
  humioHostname: <INGRESS_HOSTNAME> # Typically found in Route53 under your Zone
  es:
    tls: true
    port: 443
    inputConfig: |-
      [INPUT]
           Name             tail
           Path             /var/log/containers/*.log
           Parser           docker
           # The path to the DB file must be unique and
           # not conflict with another fluentbit running on the same nodes.
           DB               /var/log/flb_kube.db
           Tag              kube.*
           Refresh_Interval 5
           Mem_Buf_Limit    512MB
           Skip_Long_Lines  On
    resources:
      limits:
        cpu: 100m
        memory: 1024Mi
      requests:
        cpu: 100m
        memory: 512Mi
Install the chart by passing it the generated ingest token and the
humio-agent.yaml value file.
helm install test humio/humio-helm-charts \ --namespace logging \ --set humio-fluentbit.token=$INGEST_TOKEN \ --values humio-agent.yaml
Verify logs are ingested:
Go to the LogScale UI and click on the quickstart-cluster-logs repository
In the search field, enter
kubernetes.container_name=humio-operatorand click RunVerify you can see the Humio Operator logs