Creating a Scheduled Search
Go to the Repository and Views page.
Select a Repository.
Click the tab on the top bar of the User Interface and select from the menu on the left: the full list of available Scheduled Searches appears. They can have labels attached to them which are displayed next to the scheduled search name. This can be a useful way to tag the scheduled searches with meaningful data and to help when trying to locate them with a certain tag.

Figure 141. Creating Scheduled Search from Tab
Click
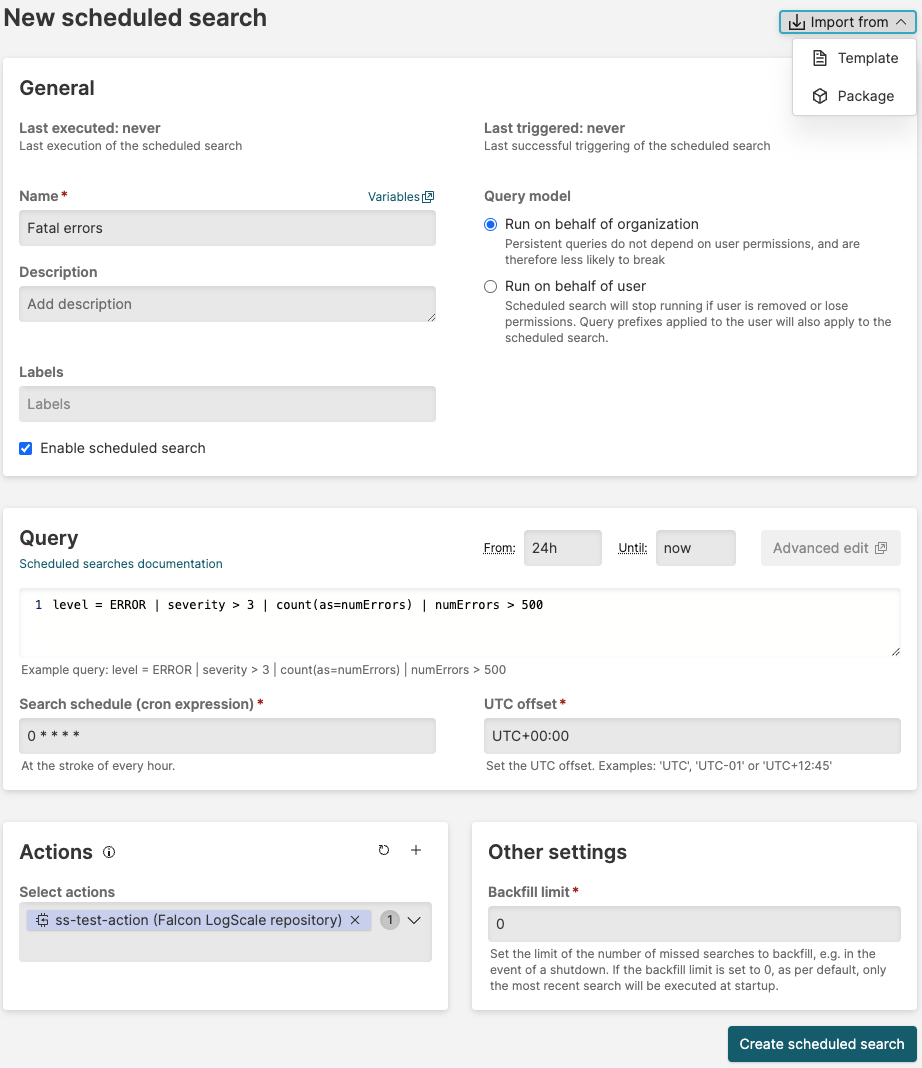
The New Scheduled Search form is displayed, click on the top right if you wish to import the scheduled search from:
, browse for or drag and drop a template based on an existing scheduled search
, invoke scheduled search templates that are part of a LogScale package
Fill in the form with the information required:

Figure 142. Setting Scheduled Search Properties
Note
Times in the cron search schedule are bsaed on UTC by default. To change the timezone, use the UTC offset to change the timezone offset. For more information on cron settings, see Cron Schedule Templates.
When you're finished setting the properties for the new scheduled search, click .
Alternatively you can use the GraphQL API to view, create, update and delete scheduled searches using the associated queries and mutations.
Note
Scheduled searches, per default, will not trigger any action(s), if a query result contains a warning. Scheduled searches have the same behavior as alerts in regards to warnings and errors, see Diagnosing Alerts page.
The following sections describe some of the fields you can set or use on a scheduled search.
Last Executed and Last Triggered Scheduled Search
The User Interface keeps track of the end search interval for when a scheduled search was run, as well as when it was last run with results — thus being able to distinguish between when a scheduled search was executed, and the last time it had results and actually triggered an action.
This information is displayed by two fields in the properties form (see Figure 142, “Setting Scheduled Search Properties”) under General:
Last executed indicates the end of the search interval for when a scheduled search query last completed successfully — whether or not any results were returned.
This means that, if any error occurs with the query or the associated actions, the time interval shown by this field will NOT be updated. See Scheduled Search Errors and Resolutions for a comprehensive list of the errors).
On the other hand, if the query result is empty, this field will be updated.
Last triggered indicates the end of the search interval for when a scheduled search query last completed successfully, and successfully triggered all associated actions.
Scheduled Search Run on Behalf of
Security Requirements and Controls
Change triggers and actionspermissionManage OrganizationspermissionChangeTriggersAndActionsAPI permissionManageOrganizationsAPI permission
You can run the scheduled search with the permissions of another user; click the Run on behalf offield to get a list of available names to pick from, or directly enter the name of the user to whom you want to transfer the ownership of the schedule search.
Search Schedule
This field allows you to specify the schedule on which your scheduled search should be run. The schedule is defined using a UNIX cron expression, as known from the crontab file found in many UNIX-like systems. There are many online tools to help you generate UNIX cron expressions that you can use if you need help writing up an expression for your use case.
For more information, see Cron Schedule Templates
UTC Offset
The Coordinated Universal Time (UTC) offset defines the temporal offset from UTC in which the search is scheduled. For instance, with a schedule:
0 6 * * *
With an offset UTC+01:00, the search
will be scheduled for 5AM at UTC.
Time Interval
As for all searches, a time interval must be specified. For scheduled
searches the time interval is given by a
start and
end time relative to the scheduled
execution time. For instance, if a scheduled search is executing at
midnight Jan 2nd with a time interval of
start = 24h and
end = now, the search will consider
all logs within the time interval:
[20xx-01-01T00:00- 20xx-01-02T00:00].
Backfill Limit
If LogScale is down or an error prevents an action from being triggered, you will miss searches that would have otherwise been scheduled and executed. When it again becomes possible for schedule searches to run and have them trigger actions, LogScale will attempt to backfill searches that were missed previously.
The backfilling behavior depends on the value given to the backfill limit, which determines how many missed searches will be executed before any new searches are scheduled.
For example, if you schedule a search every hour:
0 * * * *and LogScale is down between 10:30 and 14:15, this means that the searches at 11:00, 12:00, 13:00 and 14:00 would be missed.
Executing the most recent 'missed' search is not considered
backfilling, as this can also occur under normal operation if there is
a slight delay within LogScale. Thus, if the backfill limit is set to
0, as per default, only the search at
14:00 will be executed at startup.
If you increase the limit to 1 you
would start off by executing the search scheduled at 13:00. If you
increase the limit to 2 you start with
the search at 12:00. And if you increase the limit to
3 you start with the search at 11:00.
Increasing the value of the backfill limit beyond this point will not
have any effect in this example. Missed searches are executed in
sequence from oldest to newest.
The backfill limit may not exceed the global maximum backfill limit.